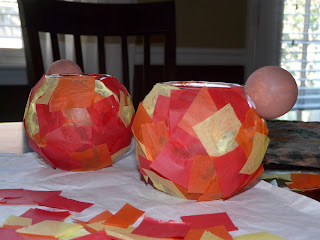
 We had a party this weekend and my daughter helped me make table toppers. These also make great decorations for this Thanksgiving season! I did end up finishing these myself since she had a really hard time getting past the glue on her hands.
Appropriate ages will depend. My 2 year old was completely capable of putting this together with assistance. However, she didn't care for this activity since the glue was getting on her hands. If this isn't an issue for your child, this activity could be really fun. Either way, the end product is great!
Materials Needed:
Glass bubble votive holder ($1 at a craft store), wooden doll head ($2 for a 6 pack at craft store), hot glue/super glue type glue, Mod Podge, fall colored tissue paper (I used red, yellow, and orange), battery-operated tea lights, tacky glue, black beads or wiggly eyes. Brush for Mod Podge.

Prep:
Glue the doll head on the glass votive and let it dry. Cut out small pieces of tissue paper. Cut a small diamond for the beak and an oval for the wattle. Cut 9" x 2" strips of tissue paper for the tail feathers.
Activity:
1. Brush Mod Podge all over the votive.
 2. Cover with tissue paper pieces, letting them overlap.
 3. Apply another layer of Mod Podge. Let dry (takes about 30-45 minutes).
4. Bend each 9x2 strip of tissue paper in half without making a crease. Twist at the bottom. Attach to the back of the votive with tacky glue.
5. Glue beak and eyes with tacky glue.
6. Take the oval and twist at the top. Attach to the beak with tacky glue.
7. Turn on the tea light and enjoy!

*From the November 2008 edition of Family Fun Magazine


3 comments:
Oh my goodness I love these, how cute! And what a sweet way for kids to help prepare the table for hosting Thanksgiving dinner by making these. Okay, this is going on my list of things to do with Tobias next year when he's older!
I keep a binder of all the activities that I find that could be interesting. There are SO many she can't do yet, but I'm hanging on to them for the future. Two isn't too young to sew pillows yet, is it? ;) heehee.
Ours turned out SO CUTE! They are going to be on the Thanksgiving table!!
Post a Comment