Welcome!

This blog is here for you to find fun learning activities to do with your children. We share great ideas we find and love on the Internet, as well as ideas we come up with on our own! We also like to share resources we find helpful.

To find ideas for your child, click on the age range blog label or on the theme/topic you are looking for (on the left side of the page). In each post, we try to list optimal age ranges for the activity, but you must judge for yourself if it is appropriate for your child. When you try an activity out, please comment and let us (and everyone else) know how your child liked it!
Showing posts with label colors. Show all posts

Tuesday, October 16, 2012

Bringing out the artist in your child

One of my daughter's extra-curricular type activities is an art class at the co-op we go to on Tuesdays. Each week they learn a little about a new artist and do some sort of art project. I was thinking about easy ways to extend what she has learned to help her remember and I came across a website (I wish I could remember where....) that took famous works of art and turned them into color sheets for their kids.
So, along those lines, I came across a fun activity that used Picasa (a free photo program) to change photos into pencil drawings. Like this:

So, I googled Georgia O'Keeffe, let Charis pick a flower she liked, and turned it into a pencil sketch via Picasa. You can do straight coloring, or work on colors, shading, etc.


Or take your own picture of flowers outside (of a goldfish if working with Matisse, etc).

Wednesday, June 6, 2012

Simple Summer Fun: Paint Finger Nails


Oh yes, this is a beloved activity of my girls. This is great--no prep, learn colors, practice fine motor skills, and practice sitting still skills! You can also get into the science of the painting. This would be a fun one for your color of the week every week. On your color day, paint your nails that color. Then you have a couple of days of pointing out what color is on the finger nails before it wears off.

Monday, April 30, 2012

Color Mixing Equations


Here we have a fun activity to help your child learn what colors go together to make another color. In case you don't know, here are some basic color creations:

Red and Blue make Purple
Red and Green make Brown
Blue and Yellow make Green
Green and Yellow make a lighter green
Yellow and Red make Orange
Blue and Green makes a Blue-green
Adding white makes a color lighter--so adding White to Red makes Pink. Adding White to Black makes Gray.

The activity pictured was done with do-a-dots. The two colors were put in the circle, and then the color they added up to was put after the equal sign.

You could have a testing paper where the child could mix colors to see what two colors created what new color. I would start by demonstrating a color combination and then let the child combine and answer.

Wednesday, October 26, 2011

Candy Corn Tissue Art


Here is a fun and simple Halloween activity that is also benign (meaning, it is not scary in the least. Another bonus, for those of you who don't like Halloween, it is a seasonal activity that is about candy, not Halloween). 

Kaitlyn did this in her preschool class this year. You can see it is rather simple-- white triangle and tissue paper squares. The tissue paper was not glued (hence the missing square), but rather was dipped in water and put on the paper wet. When it dried, it stuck.

Here is the cool possible bonus. Kaitlyn's teacher has done this in the past, but the tissue paper bled onto the paper, so the color transferred. That is what she was going for (she didn't know what happened--apparently the tissue paper brand or type might be of importance). If yours does bleed, you would want to remove the tissue paper before it dried so it didn't stick to the white paper.

I am going to try this out with different tissue papers and see if I can figure out which papers work for bleeding. My guess is the waxy feeling paper will not bleed while the rougher feeling paper will. I am starting with cheap dollar store paper...I will keep you updated when I have answers, but until then, I wanted you to have the chance to do this if you wanted! 

Monday, October 3, 2011

Fall Shape Tree


Brayden made this fun project in first grade.

Supplies
  • construction paper
  • scissors
  • glue
Activity
Have your child draw and cut out a tree trunk if appropriate. If not, do that ahead of time. Then have your child cut out various shaped leaves from different colors and glue to the tree. Again, if your child is not ready for scissors, you cut out the shapes ahead of time. Talk about the different colors and shapes as you go. When you are done you will have a fun fall picture!


Thursday, July 28, 2011

Color Mixing with Ice

This is a great outdoor activity but a few simple adaptations can easily bring this activity inside during the winter months and actually works well with a winter theme.

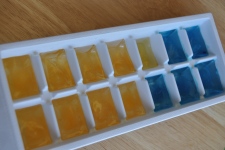
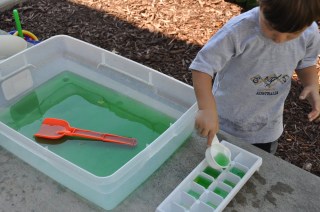
Ice is a great medium to practice color mixing.  J and I made yellow and blue ice cubes together. This is an activity all in itself, so be sure to include your little one in this step.  It's a great way to teach the process of freezing. Let them add the coloring and fill the tray using a scooper or a medicine dropper to include some fine motor skill practice!  Then they get to practice patience while waiting to play with their color cubes.

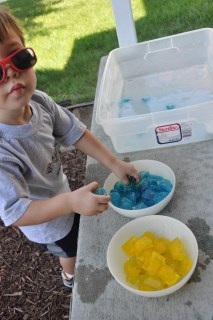
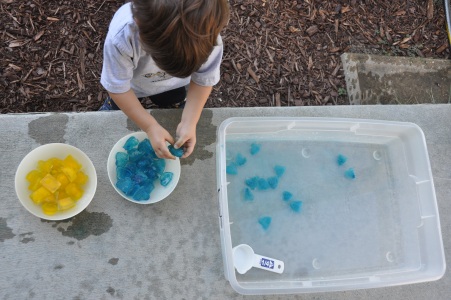
Fast forward to the activity, J first separated the ice cubes into bowls by color and chose to make blue water first.  I filled the tray with a small amount of water.  Make sure the tray is white/clear so you can easily see the water change colors as the ice melts. J really enjoys scooping and stirring the ice cubes, letting them melt in his hands, etc.  He basically plays while watching the ice melt.  This is a great time to let them utilize their motor skill practice with tongs or different size (and length) scoopers or spoons.  I’m surprised at how long a little ice can entertain! 

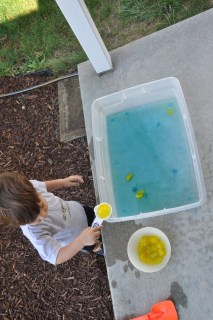
When he moved onto the yellow ice cubes I asked him which color the water (currently blue) would become and he of course guessed yellow.  I told him it was going to be a surprise that he’d have to wait and see.  He wasn’t convinced the water was actually green until the very end when there was no denying it.  He was sure it should be either blue or yellow!

We then filled the ice cube trays with green water to play with in the future.  This activity is free, entertains and recycles itself too!


Friday, June 10, 2011

Rainbow Crayons!!


Ever wonder what to do with all of those broken pieces of crayon that pile up? Make rainbow crayons! It's super easy, very quick, and fun to use to color. I let the girls choose their own combinations. We heated the oven to 300. They are done as soon as the wax melts (about 5 minutes). If you continue to let them "cook", they will blend into one color. So if you want to keep the rainbow effect, keep an eye on them. Let them cool completely and then peel the paper off.

Monday, June 6, 2011

Paper Pieces Sun


It is summer around here (or at least getting there). This is a fun activity for the sun that Brayden did in Kindergarten this year. It is a sun made from different cut pieces of paper. The pices are cut in various shapes: trapezoids, triangles, rectangles, diamonds, etc. That puts this activity covering fine motor skills, color skills, shapes, and gluing skills.

Supplies
  • Paper to glue yellow papers onto (the blue paper in this picture)
  • Yellow papers of various shades. You might also do gold as shown here
  • Scissors
  • Pencil
  • Glue

Activity
Have your child draw a circle on the base paper. This will be the circle the yellow pieces go into.

Have your child cut out yellow pieces of paper. If your child is too young to cut, do this ahead of time and talk about the shapes as you glue.

Have your child glue the pieces into the circle for to create the sun!

Monday, March 14, 2011

Paper Plate Streamer Rainbow


This is a great time of year to talk about rainbows. The rainy season of spring brings rainbows. And rainbows are something fun to tie into any St. Patrick's Day learning you may be doing.

This is a very simple activity. It is a fun, simple craft that can morph into a fun gross motor activity.

Age Range
Toddler and up.

Preparation
  • Gather supplies
  • Cut flat circle out of paper plate (as shown above)
Supplies
  • Paper plate
  • Streamers in red, orange, yellow, green, blue, purple (two shades if you can find them)
  • Glue
Activity
Talk about colors and rainbows and the order of a rainbow. The picture above is a picture of one Brayden made in preschool last year; obviously he didn't put the colors in order. You can decide if you want to focus on color order or just let the child put them on in any order.

Have your child glue the streamers onto one side of the plate. 

Now you can run around with your rainbow! One side (the empty side) is perfect for holding while your streamers stream behind you!

Tuesday, March 1, 2011

Shape matching


I recently had baby #3, and had multiple procedures done during that surgery, so things have been slow moving around here. Finally hopping back into things, I decided to start slow w/ the learning activities.
It's a simple activity you can do to evaluate progress, have a simple matching game, teach shapes (or other skill), or have a game you can pull out later that is easy for them to handle.
I went to the Dollar Store locally and bought packs of bulletin boarders in the teacher section. These are great for game pieces, making file folder games, hiding shapes, matching, sorting, etc.
Then I drew a few of the shapes on a paper and let her match them. After she matched them, I asked her to find the ____ (circle, square,etc). We also worked on colors.
Easy, quick, cheap. Great for those busy days!

Monday, November 15, 2010

Paper Plate Turkey


First of all, sorry for the terribly small picture. I took this with my phone at Brayden's school. I helped in Brayden's class this month as they made these cute turkey plates. IF I remember, when he brings it home this year, I will take a picture and add it to this post so there will be a better picture for future reference. This is a fun Thanksgiving decoration! It is great for counting, colors, fine motor, an art project, and following a sequence of directions.

Supplies

  • Two white paper plates
  • Six long strips of paper: Red, Orange, Yellow, Green, Blue, Purple 
  • Six short strips of paper: Red, Orange, Yellow, Green, Blue, Purple
  • One short orange strip of paper (for the feet)
  • One printed turkey head (try this one http://kidsdomain.com/craft/cegif/pum-tur3-head.gif)
  • Crayons
  • Glue stick
  • Scissors
  • Stapler (optional)
Method
  1. Have the child color the bottom of each plate brown. This is the side that you do not eat from.
  2. Have the child color and cut out the turkey head.
  3. Have the child cut the strips of paper so the ends resemble feathers. Most of the Kindergartners cut the ends like at an angle.
  4. Have the child cut out the orange strip to look like feet.
  5. Have the child glue the turkey head on the brown side of one of the plates.
  6. Have the child glue the feathers on the white side of the other plate. Glue the tall feathers in the middle and short feathers on the sides.
  7. Have the child glue the feet on the bottom of the same plate.
  8. Staple (or glue) the two plates together.
  9. Viola! You have a turkey.
Tip: If you want this to be an activity where your child follows a sequence of directions, it is a good idea for you to make one ahead of time. Then give the instructions and set your turkey out for the child to look at as an example. I would say this is most appropriate for children 4 and older.

Friday, September 17, 2010

Apple Sort

One of my favorite things to utilize when I taught---File Folder games!!! Imagine...all the pieces in one spot, practicing a skill, one-on-one or independent, quiet games. Oh, and talk about simple storage for you! This took me about 30 minutes TOTAL (looking for pics, printing, cutting, etc) to make.
I simply went to Google Images, typed in free clip art, and chose the apple pictures that I wanted. Cut, paste, repeat.
I made this game for my 19 month old. You can choose 2 or more colors, whatever theme you want, and the game cost me about $1 to make. :)
Supplies:
  • File folder (I bought a cheapy box of the plain. About $3 for 50 at Wal-mart.)
  • Printed and cut apples (or cars, teddy bears, etc)
  • Packing tape (I used it to "laminate" my pieces so they would last longer. $2 for a huge roll)
  • 2 white envelopes, cut in half and taped for sturdiness.

I use the pocket at the top for storage of pieces (opening facing inward to avoid pieces falling out, but ease of use for a 19 month old).

Now I have a game I can pull out when I need a few minutes to finish something I'm working on, for practicing skills together, and something for her activity tray for her to work on while I cook dinner. I can also take it easily with me to a doctor's office, or any place I need her to sit quietly and still for a little while.

She adored the pocket idea, though you could just use a white piece of paper and let the sort and stack them instead.

Tuesday, August 17, 2010

A week (or more) of Grizzly Bears!

On Friday I posted a synopsis of how I come up with a week of lessons on different topics. This is what I decided to cover/review this week:
Theme: Bears
Vocab word: hibernate
Nursery Rhyme: Teddy Bear, Teddy Bear
Number:5
Color: Brown
Fiction Story: Goldilocks and the Three Bears
Letter/sound: Bb
Math skills covered: counting, sorting, graphing
Gross Motor: Crawling like a bear for Hide-and-seek
Life Skill: manners

Day 1:
We started off the week reading a book, starting with the non-fiction book I'd chosen. (I'd checked out both a fiction and non-fiction book about bears. My fiction choice was Goldilocks and the Three Bears. ) We read the book very slowly, going over each detail. We talked about what they eat, where they live, hibernation, homes, coverings and other physical features, and habits. I taught her the rhyme "Teddy Bear, Teddy Bear". We counted to 5.

Following this activity we learned about the letter B. I'd printed off a few different B activities from First School to make it a little easier to start. I let her glue buttons to the B on the first page.


Day 2:

We reread the non-fiction book about Grizzly bears. This time I asked her questions as I read, like "What do bears do when winter comes? Do bears like to be alone?" etc. Then we did another "Bb" paper.
Review rhyme and #5.

Math/Snack: I bought a box of Teddy Grahams and would hand her a small pile. I then asked to her count how many I'd given her. It's great practice to move the bears as they count to keep from counting the same bears over and over. At the end she got to eat a few.


Day 3: Reread non-fiction. Read Goldilocks and the Three Bears. Make the letter B with Do-A-Dot markers.


Math: I printed off a gummy bear graph and she sorted gummy bears by color and then graphed them. (and then eat some, of course!)

We practiced making the letter Bb and making circles, our shape of the week. We then used pre-cut circles to make a bear face, like shown on this site. I just made my own template. Then she sponge painted it brown.

Day 4: Review Teddy Bear, Teddy Bear. Count to 5.

We made bear paws for breakfast. I confess that I know that grizzly bears have 5 toes, but they look better w/ 4 when you bake them. :) So, some have 5 and some have 4. Bear paws: refrigerated biscuit dough, roll into the paw shape, sprinkle with cinnamon and sugar, bake as directed. Easy!


We made bear ears (headband and taped on construction paper ears) and played hide-and-seek w/ berries and bugs (play food and plastic bugs). She had to walk like a bear and dig for her bugs. This is a great activity to do at night as a family. Her dad really got into it and made a little den for her. The growls and grunts were adorable. Even my 18 month old wore bear ears and played.

Math: Sort teddy grahams into piles of 5, since 5 (the # of claws on a paw) was our number of the week.

Reread Goldilocks and talked about manners.
Day 5: Dad got really into the bear talks, too. So while at work her made her a bear claw (life sized) out of wood. Now when she plays hide-and-seek as a bear, she wears her ears and her claw. :)

Oh, and I made porridge for breakfast. Yum! Both girls cleaned their plates. Charis wanted to go for a walk to let it cool, true to story.
As a review, I printed off a bunch of bear pictures from Google Images and typed in what I needed (bear hibernating, bear catching salmon, bear paw with claws, etc). We made her own bear book with easy to read sentences so she can "read" it on her own.
EX:

Bears have big claws.
Our sentences included things like: Bears eat fish. Bears eat rabbits. Bears eat plants. This is a bear cub. Bears hibernate (one sentence per page).
We made the book out of construction paper and just stapled it together.

Hope that helps! Have fun teaching and learning about bears together! I just wish our zoo had bears...it would have rounded out a good week perfectly!

Monday, May 10, 2010

In The Car: Finding Colors


This is an activity my husband came up with to keep our children occupied in the car.

He simply says, "I am going to find a blue truck. What are you going to find?" They each choose what color and type of vehicle they will find. They are then quiet as they watch for their chosen vehicle.

Not all children (or parents) will be into the type of vehicle, but we can all do colors.

Sometimes Kaitlyn chooses "pink" or "purple." We always just say okay and let her wait to figure out those vehicles are very few and far between.

This is a fun, simple way to keep everyone focused on something other than the long car ride.

Thursday, April 29, 2010

More Color Sorting

Age Ranges: 1.5-5 years

Materials:
  • paper
  • crayons
  • baskets/cups
  • puff balls

Preparation:
  • color pieces of cardstock or paper to match the colors of the puff balls
  • tape paper to the bottom of the baskets/cups
Activity:
Just start sorting the puff balls by color and encourage your child to join in. Ask questions like "where does that go?" "what color is that?". If your child starts to put one in the wrong color say "no, not there" in a neutral tone. When he gets it right praise him. This activity is very simple but changing up the materials you use to teach colors and numbers can make it more fun.

*For a child with sensory issues this activity is great because the puff balls (we got ours at Target) are pretty fuzzy and feel odd.


Thursday, April 22, 2010

Color Matching--Easter Style

Age Range: 1-4 years old

Materials:
  • plastic easter eggs
  • cardboard egg carton
  • crayons/markers
Prep:

color insides of the egg spaces in the carton to match as close as possible the colors of the plastic eggs you have

Activity:
Show your child how to put the yellow egg in the yellow hole. Practice with a few eggs and then step back for your child to do it themselves. If your child struggles simply say "no, not there, where does that yellow egg go?" and praise him when he puts the egg in the correct hole.

*For us this was surprisingly a big hit. I just knew my son needed practice with colors but he really latched onto this game. He completed it 3 separate times later in the day too!


Thursday, March 4, 2010

Egg Carton Caterpillar

Ages: 18 months +

Materials:
  • styrofoam or cardboard egg carton
  • finger paints
  • paint brush
  • newspaper/roll of paper for drop cloth
  • pipe cleaners
  • sharpie
  • art apron
Preparation:
  1. Cut egg carton in half (top and bottom).
  2. Prep child with art apron/smock. We love this one from IKEA, it's $2.99, which honestly can't be beat, and it covers all the way down the arms. (*warning, does not keep curious toddlers from putting paint in their mouths, see below picture for example)
  3. Lay out newspaper or a roll of plain paper as a drop cloth. We have this from IKEA, which comes on this holder, perfect for table-top cabinets. Normally I like to make due with stuff already at home, but these art supplies were a worthwhile investment and make a great, inexpensive gift set.
Activity:
  1. Squeeze paint out onto paper. I chose to limit us to 2 colors, one of which was our color for this week--yellow. For moms who value 'pretty' projects, this is a simple way to keep an art project from turning into a brown and black mess of colors.
  2. Help your child paint the egg carton (to be the caterpillar body) with the paintbrushes. Have fun, stop when your child loses interest or begins eating the paint, whichever comes first.
  3. Set egg carton aside to dry.
  4. Carry child with arms out away from your body to the nearest bathtub and run water. Rinse and repeat ;) (for ease of clean up I rinsed the art smock in the bathtub with Tobias and hung it over the shower head. When he was back to his normal color his clothes were still clean because of the smock, hooray!
  5. After a nap (or the next day) cut the egg carton in half long-wise and take a sharpie to draw eyes and a mouth for the caterpillar.
  6. Poke small holes in each division for legs on either side of the body. Cut pipe cleaners in half and thread each one through the body so there is a little leg sticking out on both ends. Repeat this for the antennae on the head. Allow your child to choose the color or ask them to find a particular color for you. This is a good way to informally test your child's color knowledge.

and later when we were all cleaned up and the caterpillar was ready for some legs and antennae. Notice that look of concentration :) He's such a firstborn.

Monday, February 22, 2010

Circles and O's


This is a simple activity you can do to learn about several different things. You can talk about colors, the shape circle, or the letter O. I also thought you could turn this into an Olympic rings on the flag activity. Brayden did this (pictured) at preshool.

AGE RANGE
Toddler and up. You might find this appropriate for some pre-toddlers, also.

SUPPLIES
  • Paper
  • Paint
  • Paper Cup
  • Plate to put paint on
PREP
  • Gather supplies
  • Prep work area (tablecloth or whatever you use to protect your work space)
  • Prep child (aprons or whatever you do to protect clothing)
  • Pour paint onto plates (one color per plate)
ACTIVITY
  • Have your child dip the paper cup into the end (open end down)
  • Have your child stamp the paper with the cup
EXTENSIONS
You could do this with a variety of items, including cookie cutters.

Friday, January 22, 2010

Tub Painting

When you've been trapped inside due to weather or for whatever other reason, sometimes you need to liven the routine up a little. We've been known to throw in an extra bath time during the day. Nothing like a little body painting to chase away the midwinter stuck-inside-too-long blues. At least that's the motto in this house. :)
An easy (and cheap) way to make bath time, day or night, a little more fun is to make bath finger paint.
I let Charis help mix it together using measuring spoons. The measurements don't have to be exact. I add more or less of any ingredient to get the consistency of finger paint.

Recipe:
1 T cornstarch
2 T liquid soap (shampoo, body wash, etc)
food coloring
Mix cornstarch and soap together. I usually double or triple the recipe. Then add a few drops of food coloring to get the desired color. Last time I did it I did 2 T cornstarch and 3 of soap and it turned out fine.
So far it hasn't stained anything and washes off the walls perfectly. Great time to work on colors or cause and effect from mixing colors!

Monday, December 28, 2009

Fun With Nursery Rhymes


With a little imagination, you can come up with fun ways to incorporate nursery rhymes into your week with your children. Brayden's preschool teacher is always doing fun things with nursery rhymes. One week at preschool, Brayden learned about Little Boy Blue.

They colored a little boy blue, cut him out, and glued him to a popsicle stick. They then took a bunch of grass (you could use straw or strips of paper), glued it to a crumpled piece of paper, and glued it on a paper plate.

They then used little boy blue to learn about spacial relationships. They did things like put him over and under the hay stack. It also helped them to get a visual for the nursery rhyme.

LinkWithin

Related Posts with Thumbnails