Welcome!

This blog is here for you to find fun learning activities to do with your children. We share great ideas we find and love on the Internet, as well as ideas we come up with on our own! We also like to share resources we find helpful.

To find ideas for your child, click on the age range blog label or on the theme/topic you are looking for (on the left side of the page). In each post, we try to list optimal age ranges for the activity, but you must judge for yourself if it is appropriate for your child. When you try an activity out, please comment and let us (and everyone else) know how your child liked it!

Thursday, December 31, 2009

Parts of the Face

Age Range: 12-36 months

Materials:


-blank paper
-crayons

Activity:
  • draw a circle for a face and tell your child that you are drawing a circle to make a head.
  • draw 2 eyes, color them, and point them out and tell your child these are eyes.
  • draw 2 ears, nose, mouth, and hair describing as you go.
  • ask your child to point to each body part.
  • take your child's finger and trace the circle with it.
  • have your child point to his own eyes, nose, ears, mouth, and hair.
  • let your child color the picture.


Credit:
Slow and Steady Get Me Ready by June Oberlander

Wednesday, December 30, 2009

Teaching Service


Each week, we have a night we call "Family Home Evening." We take this time to sing a hymn and have a lesson prepared by a member of the family. We include prayer and scripture study. We talk about family business and also do an activity together.

One week, my husband taught about service. He gave us each hearts and told us to do secret service for our family members. When we completed the task, we were to put a heart down so the person would know a secret service agent had been there. An example would be if your child picked up Daddy's socks for him, he could put the heart down where the socks used to be. Maybe that would be service for mom? ;)

Soon after, Brayden came home from church with this heart pictured above. He had done this in primary. Great minds think alike I guess :)

This is a fun way to get your child excited about doing service for family members.

Tuesday, December 29, 2009

Licorice Letters and Shapes

This is a fun activity to do when you are learning or reviewing letters and shapes. The age appropriateness depends on your child. If they can chew gummy candy in small pieces without choking, you can try this. The Pull-N-Peel Twizzlers are softer than most licorice, too. They don't have to be able to manipulate the licorice strings themselves, though practice can help with fine motor skills. Even watching you make shapes or letters and then trying to recognize them will help!


Materials:

*I used Twizzlers Pull-N-Peel. They seem to be very flexible and easy to manipulate.
*Hard surface, like a table or cookie sheet.

Activity:
Pull of strips of the licorice and practice making shapes, letters, or numbers for your child to identify. You can use one long strip for some shapes like ovals and circles. For shapes with corners and sides it may be helpful to break the strips apart or cut them. You can point out sides, corners, and angles when making them. ("Triangles have 3 sides and 3 corners. See the 3 points? Let's count the sides together.") You can also make letters to identify. Eat when finished! :)

Monday, December 28, 2009

Fun With Nursery Rhymes


With a little imagination, you can come up with fun ways to incorporate nursery rhymes into your week with your children. Brayden's preschool teacher is always doing fun things with nursery rhymes. One week at preschool, Brayden learned about Little Boy Blue.

They colored a little boy blue, cut him out, and glued him to a popsicle stick. They then took a bunch of grass (you could use straw or strips of paper), glued it to a crumpled piece of paper, and glued it on a paper plate.

They then used little boy blue to learn about spacial relationships. They did things like put him over and under the hay stack. It also helped them to get a visual for the nursery rhyme.

Friday, December 25, 2009

Log Rolls, Stepping Stones, and the Foot Flex

Here are two more activities you can do with your child to work on gross motor skills!

Log Rolls
1. Have your child lay on their back.
2. Instruct them to keep their legs straight and raise their arms over their heads. They are laying flat with arms and legs completely straight (like a pencil is how I explain it).
3. Tell them to try to stay stiff like the pencil as you start to roll them over. Use as little force as possible to get them to roll while still staying straight. The less you push, the more they use their abdominal strength to roll over.

Stepping Stones
1. Taking a few towels or a long piece of butcher paper, make a path for them to walk on. I used our balance beam.
2. Lay out obstacles on the floor in a straight line, leaving room between items for them to step. You can you paper towel or toilet paper rolls, small books, cereal boxes, or anything you can find around the house for them to step over.
3. For younger children, hold their arms or one hand and have them walk, stepping over the items. It takes coordination for them to step over the item, stay in a straight line, and not fall.

*You can also put pieces of paper down and have them walk or hop from paper to paper, like stepping stones. I bought a blue plastic table cloth from our dollar store and we pretended it was water.

Foot Flex and Tippy-Toes
1. Standing up, have them alternate from flat feet to standing still on tippy toes. Have them try to stay on their tippy toes without falling or teetering. You can hold something above their heads that they can only reach by standing on tippy toes.
2. Sitting with legs straight in front, show them how to point and flex their feet. I took a favorite stuffed animal and put it in front of my feet far enough away where I couldn't touch it with relaxed feet but close enough where the tips of my toes could touch it when toes were pointed. We played a game where my toes pretended to sniff the bears feet (foot pointed) and then the toes ran away (foot flexed) saying, "Pee-yew!" She thought it was hilarious.

Wednesday, December 23, 2009

Gingerbread Tips


Last year, I had a fabulous idea. We would make a gingerbread house as a family! I had in my head this picture perfect scene of my husband and me with our two beautiful children joyously creating this item so closely connected with the Christmas season.

Oh. My. It was far from that. I spent most of my time telling the children to be patient and that they couldn't eat the candy. Kaitlyn (then about 1.5) spent most of the time upset that she wasn't able to eat candy. Bradyen (then 3.5) spent most of the time anxious to decorate the house.

Once they did start decorating, my husband and I foolishly directed their moves. The whole time we were looking at each other with this laugh of, "What were we thinking?" We pretty much decided to never do that again until our kids were much older.

Fast forward one year. The effects of last year had worn off and I decided it wasn't that bad. I went for a train kit this year; a train would be better than a house! My husband kind of gave me this look like I was crazy, but was nice enough to go along with my plan.

I had thought things over and realized the problem with last year's experience was fully with the parents (um, that would be me and my husband). We wanted this perfect looking house. This year, we decided we didn't care how the train turned out--we would just let the kids have fun.

It worked! We had fun, the kids had fun, and the train turned out quite nice (pictured above)! So what are my tips for making a gingerbread creation with your children?
  1. Assemble the house/train/whatever beforehand. That way, the kids won't be sitting by you constantly asking when you are going to be done so they can decorate. This will also give the item time to set up before little hands come along...these hands are not delicate :)
  2. Give the kids candy. Give your children a little bowl of candy to eat at will. It is really quite unfair to give a child a pile of candy and then forbid him to eat any. Give him an amount you are okay with him eating.
  3. Leave perfectionism in the other room. Let your kids decorate it and forget about how it looks. In the end, in my experience, you treasure the chaotic one they created themselves more than the symmetrical one you micromanaged. If you are like me and tend to hover, do something to prevent yourself from doing so. I held my baby the whole time so I was distracted and just happy to have the older two busy :)
  4. Have fun!

More Reindeer Activities

I know that Raegan provided you with enough reindeer activity ideas to last a month, but I just had to share three more ideas!

ORNAMENT

This is a simple ornament for your preschooler or toddler to make. It requires yarn or string, three popsicle sticks, two eyes, glue, a pom-pom, paint, paint brush, and some pipe cleaner.

Have your child paint the popsicle sticks brown. Let dry. Then, have your child glue them into a triangle shape. Add a nose, eyes, and antlers. Glue a string on the back. Let dry and hang your ornament!


SANDWICHES

I wanted to make a rudolph sandwich one day and just threw it together. I only had peanut butter chocolate chips open and didn't want to open a new bag just for four pieces. I just took two pretzels, two chocolate chips, and one almond M&M for each sandwich. It isn't fancy at all, but the kids loved it! Brayden (4.5) appreciated it much more than Kaitlyn (2.5). They want a rudolph sandwich every day now. My point here is to remember that children are easily pleased. It doesn't have to be fancy or professional for them to be happy with something like this.

COLOR REVIEW
Brayden's preschool teacher used the rudolph idea to review the colors they had learned so far this year. They had a little booklet with a picture of rudolph on each page. They then put different colors of noses on each picture.

Tuesday, December 22, 2009

Time Capsule

Each year on our Christmas tree we hang an ornament that serves as our Time Capsule. After reading about a similar activity in The Siblings' Busy Book, I decided to trade in our ornament for a bigger version. We are doing this on Christmas, and I'll wrap it and pack it away with the Christmas decorations. Next year I'll place it under our tree to open as a family.

Ages: Any!
Materials: shoebox, wrapping paper, ribbon and scissors, scale, construction paper, markers, index cards or paper
Directions:
1. Using the index cards or paper, label each one with a member of the family's name. On each paper, record height, weight (optional for adults...haha!), special skills, characteristics, hobbies, funny stories, physical characteristics,etc.

For example, on my toddler's paper I might write: Her hair is long and very curly. She cringes when she sees the brush! She has two small freckles on her right cheek. She is almost ____ pounds and ____ inches tall. She can count to ___ , knows all of her alphabet, but mixes up the letters P and R sometimes. Her favorite song is ______ and her favorite movie is Richard Scary's Counting Video and any Sing-a-long. She loves Frosty the Snowman, but calls him "Tashy." She loves rhyming games, especially rhyming her sister's name.

For a baby: She weighs ____ and is ____ inches long. Barely any hair yet! She has ____ teeth and just started crawling. She keeps trying to pull up to standing, but bonks her head a lot trying this. She loves it when her sister walks into the room. Her favorite person right now is her daddy. She loves saltine crackers and grabbing the dog's ears. She also buries her head in your shoulder, giggling, and pretending to be shy when someone she loves talks to her. She's ___ months old but she wears size ___ clothes.

You can include number of teeth, unique characteristics, favorite toys or foods, things they sleep with, etc.
Trace hands and feet on construction paper. You can also use ribbon to record height, head circumference,etc.
I am going to take a picture of us in front of the Christmas tree and include it in the time capsule.
I also include a paper describing our Christmas that year, like where we went, special events, funny things that happened, what they got for Christmas, etc. One of my favorite things has been hanging on to these papers and reading them year after year. This is what we used put inside an ornament year to year. I have one from when I was 9 years old that I wrote. It's one of my favorite traditions!

Monday, December 21, 2009

Candy Train


Brayden made this really cute candy train at preschool this past week and I just had to share it!

SUPPLIES:

  • Milky Way Candy bar (it needs to be something soft in the middle)


  • White frosting


  • Cardboard covered in foil


  • String licorice


  • Stick pretzels


  • Bell shaped chocolate


  • M&Ms or other round candy for wheels


  • Candy for decorating the train


  • Candy canes for connecting train cars


  • Rectangle piece of chocolate

METHOD:

  1. Spread frosting on foil


  2. Lay licorice and foil down for the train tracks


  3. Break the candy bar up into three pieces


  4. Connect the candy bar pieces with broken candy cane pieces


  5. Add wheels and other candy to the train, sticking it to the train using frosting


  6. Put rectangle piece on top of the front piece of the train (the engine)


  7. Put the bell-shaped chocolate upside down on top of the rectangle piece


  8. Take a picture


  9. Eat!


Friday, December 18, 2009

Snowmen Ornaments


We made these ornaments when I was teaching and they turned out so cute! You'll need white acrylic paint, assorted permanent markers (or paint markers), and blue ornaments. Shatterproof ornaments work really well. I like the matte blue ornaments rather than the shiny, but use what you like best. We tried a bunch of different colors, and the white hand prints against the blue ornaments seemed to work the best. If you have the choice, get a big pack of the ornaments. The first few didn't turn out well, but I got better the more I did.
Directions:
Paint their hand with the white acrylic paint. *More paint seems to mean more smearing, so try a light coat.
I physically took my daughters hand, told her not to move any of her fingers and had her grab the ornament, and lightly pressed on each finger to get the print.
Let them dry.
Use a permanent marker to draw faces, hats, scarves, and buttons.
Print name and year on the back. I used a paint marker for that.
If giving as a gift, you can attach the following poem:
These aren't just five snowmen
As anyone can see.
I made them with my hand
Which is a part of me.
Now each year when you trim the tree
You'll look back and recall
Christmas of 2009
When my hand was just this small!

Wednesday, December 16, 2009

Texture Cards

Materials:
-4 small "cards" made of construction paper or foam paper
-glue
-something rough (sand, rice, or salt)
-something soft (cloth or cotton balls)
-something bumpy (beans or just something to make the foam paper bumpy)
-sharpie

Preparation: (kids above 2 years old can help with this)
  1. write 4 types of texture on the cards (rough, bumpy, soft, smooth)
  2. spread glue on the rough card and sprinkle sand, rice, or salt over it, then tap the card over the trash can to get the excess off. Set aside to dry.
  3. spread glue on the soft card and spread something soft over it. Set aside to dry.
  4. for the bumpy card either glue beans onto it or simply poke indentations in the foam paper to make it feel bumpy.
  5. the smooth card stays the way it is.
Activity:
-let your child examine each card and tell them what each card is.
-have your child close his/her eyes and tell you which texture card they're feeling without looking at it.

Extensions:
-This could be a part of a bigger unit on the 5 senses or parts of the body. This would be a great way to discuss the sense of touch, skin, or hands.
-ask your child to find other things that feel bumpy, rough, smooth, or soft. They could go on a scavenger hunt throughout the house to collect real objects or simply draw pictures of them.
**this activity would be good for a child with sensory processing disorder to gain controlled, small amounts of experience with different textures on their skin.


Christmas Symbols Poem


This is a poem I wrote last week for the symbols of Christmas. Last night, we did family night with a lesson on the symbols and what they remind us about that first Christmas night. I bought treats to represent each thing in the poem. Afterward, Kaitlyn was talking about one of the treats, and Brayden corrected her that it was a wreath, not a cookie :) They enjoyed going through the poem and learning about the symbols. I think it helped them to have something concrete to hold as we talked about each thing.
Here is the poem with what we did for treats. You are welcome to use the poem, just please keep the credit (me) with it.
Remember Christmas
by Valerie L. Plowman


Red reminds of the blood He spilt
to wash away and cleanse all of our guilt
White is for His actions, most pure.
Through sinless perfection, He did endure.
Green is for the life eternal
we can obtain through our Lord supernal.
The star shines like the one so bright
that twinkled above that first Christmas night.
The fir tree is for many things:
the tree of Jesse--the father of kings,
and for the needles pointing to the Lord--
that little babe we all adored.
The wreath shows one eternal round;
the begin' of the Lord cannot be found.
The lights remind us that this babe
is the light of the world, and born to save.
The candy cane is for the crook;
not one sheep or lamb the shepherd forsook.
The Christmas bells we love to ring
proclaim joy! The birth of a newborn king.
These symbols remind us that we,
more like the three wise men all now should be.
Earnestly seeking to find the new babe
who humbly in a manger laid.
  • Red: We used Christmas M&Ms
  • Green: We used Christmas M&Ms
  • White: We used white taffy
  • Star: We used starburst candy. You could also buy a star ornament for each person--or even cut a star out of paper.
  • Fir Tree: I found some cute tree suckers at Dollar Tree. It had a star and lights (or ornaments) on it, so it could work for many things for you.
  • Wreath: I went with chocolate cookies that are round. They also sell jelly filled chocolates at Christmas time. You could do a doughnut and even put green dyed coconut on it.
  • Lights: I just put lights around the poem, but you could get a strand of lights out or use little flashlights.
  • Candy Cane: I used a candy cane :)
  • Bells: I put a little bell in each bag.

Tuesday, December 15, 2009

Fun with buttons

Using a pack of primary colored buttons (less than $2) I got from a craft store, we've been working on a few math skills.
All of these activities are great to introduce to as young as pretoddlers, provided they will at least watch you.
Activity #1: Counting
Our number of the week was 9, so we counted out buttons in piles of 9. Count out loud and move the buttons as you count. When counting it is important for young children to move objects to avoid confusion and, what I call, counting in circles (counting the same items over and over).
*If you do this activity and #2 on the same day, do this one first. Otherwise young children may have a hard time transitioning and may want to continue sorting by color if you do #2 first and then try activity #1.
Activity #2: Sorting by color
Start the piles for young children. Depending on the age or skill level, you may need to go button by button with them. You may also need to only give them a few colors at a time, as more may be overwhelming. My 2.5 year old was able to handle 5 color sorting with no problem.
If your buttons have different shapes, you can also sort by shapes or other attributes.

Activity #3: Patterns
Patterns can be pretty difficult! Keep in mind that in Virginia this is a Kindergarten standard of learning, which means 4,5, or 6 year olds. It's a great introduction, but don't get frustrated if they don't see the patterns right away. Be patient!
Start with AB patterns if just introducing them or if working with young children. I started with 2 different objects: buttons and clothespins. I started the pattern (ABABABABA___) and asked my toddler if she could tell what would come next. Verbalize the pattern by saying "Clothespin, button, clothespin, button, clothespin...what do you think is next?"

Then we moved to colors.


I then let her have free play with them, where she ended up stacking them and making pictures out of them. I didn't even think of that! :)

Monday, December 14, 2009

Christmas Tree Art

Pictured: Kaitlyn's tree (2.5) and Brayden's tree (4.5)
This week, we are learning about Trees, Evergreens, the color Green, and Triangles. For our "green/triangle" day, we made these tree pictures. My kids are old enough to recognize that a tree is in a triangle shape. If your child is just learning shapes, you might want to make it an actual triangle.

AGE RANGE
I would say two and up for sure. 18-24 months is possible. You might be able to modify for younger.

SKILLS TAUGHT
  • Fine motor skills
  • Colors
  • Shapes
  • Option for focus on numbers or letters

SUPPLIES

  • Green paper (or you could color a white paper green)
  • Hole punch
  • Yarn/string/ribbon/etc.
  • Tape
  • Scissors (if your child will do the cutting, child-safe)
  • Glue
  • Q-tip
  • Sequins

PREP

  1. Draw tree on paper
  2. If your child is too young to cut, cut it out
  3. If your child will not be cutting out the tree, punch holes in it
  4. Cut piece of string/yarn/ribbon/etc to go through holes on tree
  5. Put a piece of tape on the end of the yarn so it can easily fit through the hole
  6. I put a small amount of glue in the lid of a plastic baby food container

ACTIVITY

  1. Give your child the tree. For Kaitlyn, I cut it out. I let Brayden cut his out himself.
  2. Once tree is cut out, punch holes.
  3. While Brayden cut out his tree, I helped Kaitlyn put the yarn through the holes on her tree. Tape one end to the back of the tree at your starting point. When you are done, tape the other end at your finishing point on the back of the tree.
  4. I had the idea after we did this that you could put a number or letter of the alphabet by each hole to create a "dot-to-dot" type of activity for your child and get some extra learning in :)
  5. Have your child use the Q-tip to put a dab of glue where she wants a sequin.
  6. Have her place her sequin on the glue
  7. Decorate the tree as desired
  8. Dry and hang!

Friday, December 11, 2009

Homemade Ornaments

Here's 2 recipes for ornaments to make with your kids this holiday. The first recipe is the classic applesauce and cinnamon ornaments. Super easy and smells great! I have my applesauce and cinnamon ornaments that I made 25 years ago and they still smell like cinnamon! I hung them on a tiny tree last year and the entire room smelled like cinnamon for weeks. I store them wrapped in tissue paper in a cookie tin.
The second recipe I haven't tried yet, but will be this weekend. I'm going to try to do the girls hand prints as ornaments, too.

Cinnamon Applesauce ornaments
Ingredients:
Applesauce (regular)
Cinnamon
Wax paper
(I've used glue before, but they hold up fine without it)
Directions: Mix equal parts cinnamon and applesauce. You may need to add more of one to get it into a dough consistency. If you only want a few ornaments, use 1/2 to 1 cup of each. I squish it with my hands to mix it...fun for kids! Then roll it out. The thicker the dough, the longer it takes to dry. Using cookie cutters, make ornament shapes. I use a straw to poke a hole in the top to tie a string through once it's dry. Lay out on wax paper. The next day flip them. Don't store until completely dry.

Salt Dough Ornaments
(courtesy of Beth Ann Atkins)
Ingredients:
1/2 c. salt
1 c. flour
1/2 c. water
Rolling pin
cookie sheet
toothpick
cookie cutters
food coloring (optional)
paint (optional)
glitter paint/glue (optional)
ribbon (if you're making ornaments)
You can also add cinnamon to the dough before baking so that it smells yummy!
Preheat oven to 250. Mix together salt, flour, and water until dough is formed. You can add food coloring if you want colored dough. Knead the dough on floured surface until mixture is elastic and smooth. If dough is too sticky, sprinkle with flour, continue to do so until stickiness is gone. Do not add too much flour as this will dry out the dough and will cause it to crack before baking. Roll out the dough to about 1/4 inch thick. Use cookie cutters to make shapes. Use a toothpick to make a hole at the top if you intend to make ornaments. Place shapes onto UNGREASED cookie sheet. Bake for 2 hours. Remove & allow to cool completely. Once completely cooled, decorate as you wish! Thread ribbon/yarn through hole if you're making an ornament (& don't forget to write and name & date on the back so you'll always remember when it was made :-).
If you aren't making ornaments, you can also put a magnet on the back or make them into lapel pins.

Thursday, December 10, 2009

Tot School Activity List

I've had difficulty getting my ideas for Tot School into a workable format and really needed a more user-friendly form. So I made this one! Along the left hand column I wrote down several different categories of activities based on the skills practiced. Then I listed 3 separate activities for each category. So if you realize you haven't done pouring in a while and your mind goes blank on activities, it will be easier to reference this list. Click on it and you can see the larger format to read it easier.


I also have a tiny request from anyone reading this blog. Could you state which activities here you have tried and at what age? And then tell me whether your child did it independently, with assistance, or was unable to do it? I'd like to get some more reference points for what the age-range for each activity is so I can make one of these forms for the 12-18 month range, one for the 18-24 month range, and so on. I'll be working my way through these with Tobias but he's only one child and is past the 12-18 month age range already. It would really speed up the process to have other mom's opinions!

Oh, and anyone is welcome to download, print and use this form. I'll hopefully figure out how to get the actual form downloaded in a more share-able format but for now it is simply a picture format and even that took me over an hour to figure out, lol!

Wednesday, December 9, 2009

Christmas Symbols and Meanings


There are many symbols we decorate with at Christmas time that are symbolic of deeper meanings. We can do things like put up a nativity set to teach our children about the purpose of Christmas, but there is much more that we can do. As you decorate, you can tell your children what each item symbolizes and why we decorate with it. If you have already decorated, you can go around the house looking for the symbols and talk about them. Here is a list of common decorations and the things they symbolize.


  • Color Red: The color red symbolizes the Savior's sacrifice for us. It is for the blood He spilt for us.
  • Color Green: The color green symbolizes eternal life--life everlasting.
  • Color White: The color white symbolizes the purity of Christ.
  • Color Gold: The color gold symbolizes the royalty of Christ.
  • The Star: the star is representative of the star that shone at the birth of Christ, fulfilling prophecy. The star marked the place where Christ lay, and is the shining hope of all mankind.
  • The Evergreen Tree: Also known as the fir tree...your Christmas tree! This tree represents everlasting life. It is green all year round. Evergreen needles also point up to Heaven. This tree can also symbolize the Jesse Tree; Jesse was the father of King David. Christ is from that lineage.
  • The Bell: Shepherds ring bells to guide lost sheep back to the fold. Remember the parable of the lost sheep; the Shepherd searches for one lost even when he has his ninety-and nine (99). The bell symbolizes that all are precious in the eyes of the Lord. Bells are also rung in celebration for the birth of Christ.
  • The Candle: The candle is a smaller representation for star light. This reflects our gratitude for the star of Bethlehem.
  • The Lights: The lights represent that Jesus is the light of the world.
  • The Gift Bow: The gift bow represents that we should all be tied together in bonds of goodwill.
  • The Candy Cane: The candy cane represents the shape of a shepherd's crook. This crook is used to bring lost lambs back to the fold. The colors (red and white) are used purposefully (see color symbols above). If you turn the candy cane upside down, it makes a J, for Jesus.
  • The Wreath: The wreath has a couple of meanings. One thing to note is that it is round--circular. It is a symbol of the never ending...never ending love, as well as the never ending Lord. He is the beginning and the end.
  • The Holly: One interpretation for Holly represents the crown of thorns. Holly was introduced as a Christmas item in order to eclipse the use of mistletoe.
  • The Angel: This is quite obvious, but the angel represents the angels who proclaimed the birth of the Savior.
  • The Poinsettia: The poinsettia is representative of the Star of Bethlehem (see star symbol above).

These are a few of the most popular Christmas symbols and their alleged meanings. It is, of course, impossible to know exactly what the story is behind everything (for example, the story of the candy cane is not known for sure), but these symbols are all good :). We can take what we have and apply them to our celebration of Christmas and help us remember to focus on the full meaning of Christmas each year.

Tuesday, December 8, 2009

Stork Stands and other Gross Motor Control Activities

Gross Motor activities deal with the large muscles in the body and their movement. It's important for kids to work on gross motor skills to strengthen their large muscle groups. Kids that have trouble with gross motor skills can later have trouble with fine motor skills, like drawing, writing, and cutting.
Here are a few fun things to do with your kiddos to help with gross motor control and strengthening different muscle groups. Many of them require them to focus attention on one or two specific groups and use control to guide the movements.


Rock Backs: For young children, hold them in your lap for this activity. Toddlers may be able to do this on their own. My two year old likes to do it both ways. Whether on your lap or on their own, they are still getting benefits of muscle control and abdominal strengthening.
Sit cross-legged with knees pointing toward the ceiling or sit with your knees toward the ceiling and legs bent and closed. Grab knees and hug. Rock backwards, keeping knees and legs tight into the body. Try to rock back and roll back up to a sitting position. You have to use stabilizing muscles to keep the body in control and abdominal muscles to pull back to a sitting position.


Stork Stands: Standing up tall, hold arms straight out to the side, like an airplane. Take your foot and place the bottom of the foot on the inside of the opposite leg. Try to hold that position for as long as possible. Switch legs! My daughter needed to hold onto the wall first to get her balance.


One leg Raise: Sitting on your bottom, lean back and support yourself with your hands (arms straight). Try to raise just one leg at a time. Then try both at one time. Make sure you aren't leaning back to raise them up, but rather using your abdominal muscles to raise your legs.

Walking while grabbing ankles: Exactly what the name says! Grab your ankles while keeping the legs straight and try to walk.


Wheelbarrow: This is an activity that they need your help with each time. Have your child stand up straight. Then have them place their hands on the floor. Slowly grab their legs and lift. Telling my toddler to walk with her hands was helpful since she wasn't sure what we were doing at first.


Hopscotch: Doing this correctly wasn't really doable the first few times for my toddler. This activity takes lots of practice. Hopping with control on one foot is the first step. Then try hoping on one foot and switching to two feet. We recently got a great hopscotch rug from Wal-Mart that Charis has in her room.
Bubble Wrap Hopping: With all the packages and mailing we do around Christmas, we usually have some bubble wrap left around the house. Today we practiced hopping, jumping over, jumping on the balls of the feet, and jumping into a stradle position over the bubble wrap. She got a kick out of the popping sounds and it helped her focus on landing hard and keeping her balance at the same time.

Monday, December 7, 2009

Christmas Tree Rice Krispy Treats


This is a fun activity to add to your "tree" week. You can do this any time of the year. We are learning about trees during the month of December, and talking about evergreen trees.

AGE RANGE: as soon as you start allowing them to help cook. I would say most 15-18 month olds and older can do this.

SUPPLIES:
  • Saucepan. You could use as small as a 3 quart, but I like to use a 6 quart so you can stir without spilling. Helpful for me and the children :)
  • Rice Krispies: 5 cups. I always buy the inexpensive rice krispies in the bags (like Malt-O-Meal).
  • Marshmallows: 4 cups miniature (which equals about half a bag) or 40 regular.
  • Butter: 1/4 cup.
  • Green food coloring.
  • Candies to decorate tree (like red candies or string liquorice)--optional.
  • Regular size marshmallows for base of tree--optional.
  • Toothpicks--optional.
  • Cookie sheet.

ACTIVITY:

  1. Get cookie sheet out and grease or spray with non-cooking spray.
  2. Melt butter in saucepan.
  3. Add marshmallows. As you are measuring, be sure to incorporate math skills. For the younger toddler, it might just be saying "We need to fill this up 5 times. Can you help me count?" As your child gets older, you can increase the difficulty of this. Brayden (4.5) is quite good at math and can do simple addition in his head. He has also started learning about fractions (thanks to my husband the engineer). When we made these, I used a Pyrex measuring cup that measures up to 2 cups. I told him we needed 4 cups of marshmallows. I then told him our measuring cup held two cups and showed him where the two cup mark was. I also showed him where the 1 cup mark was. I asked him how many times we needed to fill it up, and to what, to reach five cups.
  4. Cook over low heat, stirring constantly until smooth and all marshmallows have melted.
  5. Add food coloring, continuing to stir constantly.
  6. Remove from heat.
  7. Measure out Rice Krispies. Do the same for measuring this as you did with the marshmallows. Use this as a teaching opportunity.
  8. Add Rice Krispies. Stir until well coated.
  9. Butter hands. I just sprayed cooking spray on our hands.
  10. Put a spoonful of the mixture on the cookie sheet and have your child form into the shape of a Christmas tree. You might want to show him how first. Also, it might be hot, so check to make sure it is cool enough before letting your child touch it. This is a good opportunity to talk about three dimensional shapes.
  11. Continue until mixture is gone. Re-butter hands as needed.
  12. Decorate trees if desired.
  13. Once formed, you can add the tree base by sticking a toothipick in a large marshmallow and then into the base of the tree.
  14. Eat and enjoy!

Please note that these are not gooey rice krispie treats. These have less butter and less marshmallows to help the tree stay up, but it has less fat, right? Right? :)

Friday, December 4, 2009

Reindeer Week

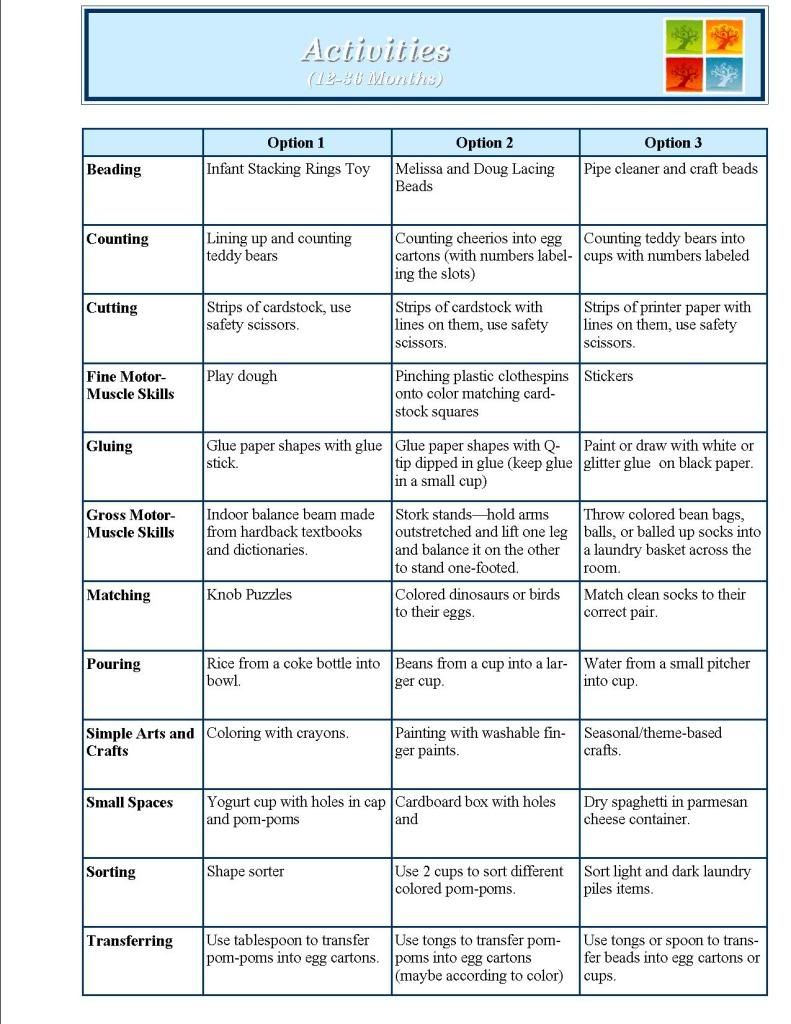
This week we are learning about reindeer. I decided to take it a step further and go ahead and make the Learning Poster Val posted about, and make it a reindeer themed week. Here's what we are doing:

1. Hands and Feet Reindeer: This is great as a keepsake for little hand prints. :) You'll need brown and black paper, plus 2 small white circles (for eyes, or you can use big wiggly eyes), one black circle for the nose, red glitter (optional), glue, scissors, pencil for tracing.

Trace their foot (or feet if you are making more than one) on brown paper. Trace hands on black or tan paper. These are for the antlers, so make them whatever color you want them to be. You need 2 hands and one foot per reindeer. Let them glue the hands on top. Since my daughter is still not a fan of glue on her hands, we use cotton swabs to let her put the glue on her papers. Glue eyes and nose on. Cover the nose with glue and let them sprinkle red glitter on the nose if they want to make Rudolph.


2. Reindeer Cookies: You need sugar cookie dough (store bought is fine), pretzels, chocolate chips, and M&Ms. Before you start, break the pretzels up to look like antlers.
For the kids to do: Roll the sugar cookies into balls. Stick 2 pretzel on for antlers.
For you to do: Bake according to sugar cookie directions. While they are still hot stick on the M&M and chocolate chips. Learn from my mistake. :) If you bake them on wax paper, you can slide them off the cookie sheet so your child can stick them on without fear of burning themselves on the pan.

3. Reindeer Breakfast: Williams Sonoma has these GREAT pancake molds. Super easy, easy to clean, and they have a snowman, too. That way it can be used past Christmas. Served pancakes with a side of pretzel sticks and dried berries (sticks and berries). I invested in these because they are very nicely made and will last a long time. I think we'll get lots of use out of these.

4. The letter R. We've been using letter stamps and stamping papers. Holding the stamps, pressing on the ink pad, and pressing hard enough to make the letter on the paper are great for hand strength. Also, if you put lines on a paper and have them stamp on the line, you can work on hand-eye coordination as well.
I also use clear squeeze bottles to make pancakes in the shape of the letter R.
We have cookie cutters in the shape of letters to cut out cheese, lunch meat, bread, etc.

5. Shape of the week:
If it's triangles, make open-faced reindeer sandwiches. Cut a slice of bread in half diagonally. You'll have 2 triangles. I let my toddler use a plastic knife or spreader to smear on peanut butter. Add some pretzels for the antlers. Cut a banana up in coins. If you cut one of the coins in half, you can use those for eyes. Chocolate chips, shredded cheese rolled into a ball, or brown M&Ms work. For the nose you can use raisins, craisins, or M&Ms.
Draw a reindeer out of basic shapes on a piece of paper. (Triangle=head, circles for eyes and nose, long rectangles for antlers). Use the Do-A-Dot markers to color. Helpful if the shape of the week is a circle, too.
Try shape pictures. You can also cut out shapes and let your child try to make a reindeer out of the shapes.
6. Puzzles: This is a do-it-yourself puzzle. Find a picture of a reindeer and print 2 copies. Depending on the skill level of your child, cut one picture into pieces. Show them the original and let them try to put the puzzle together. When just staring out or for young children, start by cutting the picture in half or fourths.
7. Make a touch-and-feel reindeer book. Sounds complicated, but it really isn't. Some reindeer facts you need to know first.
  • Reindeer have antlers that are covered with velvet when growing. The velvet falls off once the antlers get to the correct size. The antlers help them hear! *Cut out antlers using felt, velvet, or cloth and glue them on a page.
  • Reindeer like it cold! Using paper or a coffee filter, cut out a snowflake and glue it on another page. If you don't know how to make a snowflake, try this website for directions.
  • They can swim easily. Take a picture of a reindeer and glue down crumpled blue tissue paper (like it's swimming).
  • The hooves can change depending on the season. In the summer, they are soft and spongy and in the winter they are hard. Cut a hoof out of a sponge and piece of cardboard (like from a box).
  • They like to eat moss, but will eat leaves and grass. Take a walk outside and get some reindeer food to glue in your book.
8. Reindeer Song: (Sounds like 5 Little Monkeys Jumping on the Bed)
Eight little reindeer pulling Santa's sled
One fell down and bumped his head.
The elves called Santa and Santa said,"Can seven little reindeer pull my sled?"
(Go from 8 to 1, repeating the above lines)

One little reindeer pulling Santa's sled,
He fell down and bumped his head.
The elves called Santa and Santa said,"Call Rudolph!"
(Works on rhyme, and counting backwards from 10 to 1, and finger recognition of numbers)
9. Reindeer food: Mix oats and glitter or oats and green and red sugar/sprinkles. Sprinkle outside for the reindeer Christmas eve. We've added raisins, too.
10. Reindeer bird feeders: a new spin on the traditional peanut butter bird feeders. Cover a pine cone with peanut butter. Place pretzels for antlers and raisins for eyes and nose FIRST. I used dried cherries for the nose and prunes for the eyes. Depends on the size of your pine cone. Then roll in bird seed. (I saved an old coffee can and put the pine cone inside with birdseed and let my toddler shake it. Less mess!)
11. Footprints: Cut out 2 sponges like reindeer footprints. Get the sponges wet and tape them to your child's shoes (or tie them). The tape doesn't slip if you wrap the masking tape all the way around the shoe. Put a huge piece of paper on the floor. I used brown (like dirt/mud). The sponge will make footprints on the paper as they walk. I put a string down and had Charis try to walk in a straight line. We also pretended to dig for food like reindeer do. The prints dry quickly, leaving a clean piece of paper to draw (or stomp) on. Since it's just water, there wasn't much to clean up!

Have fun!

Thursday, December 3, 2009

Advent Prayer Beads and Advent Wreath

On the post about preparation for Christmas and general traditions for the advent season I mentioned two traditions we do in our home. The first is the lighting of the advent wreath each Sunday. There are 4 candles on the advent wreath, we bought our candle holder at a Christian book store for pretty cheap and added a wreath around the edges. The four candles represent the four weeks of advent and also hope, love, joy, peace. We light one additional candle each Sunday after church (we attend a 5pm Mass) until all four are lit. The pink candle (joy) is the third to be lit so it goes in a circle starting with the front candle.


The second tradition that I am starting this year is saying an advent prayer each evening, using prayer beads to keep track of the prayers. These are called chaplets in the Catholic tradition and can have either a saint medal or a cross at the bottom. My husband is Protestant and does not recognize saints so we used plain crosses. If your faith tradition doesn't use crosses a simple bigger bead at the bottom to mark the end point would work just fine.

Materials:
purple or blue beads (the colors traditionally associated with advent)
smaller silver beads to go between the larger colored beads
Cardstock with prayer printed on it. To print the version I used, click here.
*these materials can be found at any craft store, I bought mine at Joann's.

Activity:
Tie a knot around the clasp at the top of the cross, then add 2 small beads, 1 large bead all the way around until you have 15 large beads. Tie a knot when you're finished.

In the evening sit down as a family and each family member can hold their beads and (for literate children) the prayer you've chosen printed on cardstock.

Say the prayer 15 times, moving your fingers along each large bead to keep track. This is an extremely meditative practice and is great for focusing attention on the Lord. In our home Tobias is still very young so he just played with his beads while I said the prayers :) But over time he will be expected to at least sit quietly during this prayer time and later will follow along with the beads and eventually pray with us. For now his only participation is to watch us and say "Ahh-may!" at the end.


*Shoes are not required for this activity, in fact Tobias discovered that the prayer beads are perfect size to fit around his foot and ankle :)

Wednesday, December 2, 2009

Alphabet Puzzle

This is a major hit with both my 4.5 year old and my 2.5 year old. It is great for learning to recognize uppercase and lowercase letters while incorporating fine motor skills.

AGE RANGE
As soon as they are old enough to know and recognize their letters. I got this idea from Preschooler's Busy Book, which is for ages 3-6, but as I said, Kaitlyn does this really well at 2.5.

SUPPLIES
  • Index Cards
  • Pen/marker
  • Scissors

PREP

  1. Write a capital letter on the left side of the index card and a lower case letter on the right side of the card.
  2. Cut each card in half. Cut in wavy or zig-zag lines. I used my scrap booking scissors.

ACTIVITY

  1. Set out sets of letters. To start, I just did about six matches (so 12 cards). As I saw they could handle more, I did more.
  2. Have your child find the matches.

HINTS

  • If you have an older child who knows letters really well, you might not want to do colored index cards because they can use the colors to help find the matches easier. What I did with Brayden was just set out all red cards together, all yellow cards, etc.
  • If you have a child who likes things perfect, do this activity on a table or another hard surface so the two pieces will fit together nicely :)

EXTENSIONS

  • If you do them on colored index cards, you can flip them over and do color matching.
  • You could also do this with numbers, shapes, mommy and baby animals, etc.

PHOTOS


Tuesday, December 1, 2009

Christmas Books and Recommendations

Here's my list of Christmas or Hanukkah books that are in my collection. As I find more, I'll add them to the list. Feel free to let me know some great books and I'll add your suggestions, too! Our tradition is to buy a new Christmas book for our collection each year. We spend the last part of Christmas Eve reading them.
I included pictures this time around. If you are like me, you may not remember a title of a book but may remember the cover. This way if you happen upon one of these books, you may know if you are interested in it without even flipping through it (which can be time consuming when little ones are with you).
Another recommendation is to check to see if your local library is online. Our library will let you reserve books online and pick them up at a drive-up window.
Lastly, I included the link to buy these books at either Amazon.com or Barnes and Noble.com. Some of the books are as cheap as $.01. Yes...a penny. I'm not kidding! Enjoy!
**: A favorite!

The Animals' Christmas Eve by Gale Wiersum---The birth of Jesus told by the animals in the stable. A counting and rhyming book.

Bear Stays Up For Christmas by Karma Wilson-- Bear's friends wake him from hibernation to celebrate Christmas together. A rhyming and repetition book.

**
Counting to Christmas by Nancy Tafuri---A little girl recounts all the things she does, day by day, to get ready for Christmas. A counting book. A favorite when my daughter was 18 months.

The Legend of the Candy Cane by Lori Walburg---A little girl learns about the meaning of the candy cane and how it represents Jesus.


How Santa Got His Job by Stephen Krensky---A humorous story about all the jobs Santa had before becoming a deliverer of toys. Great for older kids that don't believe in Santa or understand a play on words.


The Night Before Christmas by Clement C. Moore, illustrated byJan Brett--- The classic!

Light the Lights by Margaret Moorman--A story about families that celebrate both Christmas and Hanukkah.

**The Littlest Christmas Tree by Janie Jasin---A story about a tree that wants to grow tall enough to become a Christmas tree. So sweet!
**You Are My Miracle by Maryann Cusimano Love--A rhyming book about the relationship between a parent and child. I bought this as a Christmas gift for my husband and daughter one year. A great gift book! (And it might make you cry, too).
If You Take a Mouse to the Movies by Laura Numeroff--from the author of If You Give a Mouse a Cookie and other circle stories. Lots of fun!
**Olive, the Other Reindeer by J. Otto Seibold and Vivian Walsh---After hearing a familiar Christmas carol, Olive the dog thinks she is really a reindeer and heads off to the North Pole to join Santa.

Punchinello and the Most Marvelous Gift by Max Lucado---Punichello and the other Wemmicks all try to come up with a gift to give Eli on Maker's Day. A board book about giving.

**Room for a Little One by Martin Waddell--- A kind ox welcomes many animals into the stable. All the animals welcome Mary and Joseph and finally baby Jesus into the warmth of the stable. Lots of repetition for toddlers and preschoolers to help with. Very appropriate for small children through early elementary school age.

Rudolph the Red Nosed Reindeer by Robert L. May---No need for explanation. :)

A Visit from St. Nicholas and Santa Mouse, Too by Clement C. Mouse--A version of The Night Before Christmas with Santa Mouse included in the illustrations.

**Who Is Coming to Our House? by Joseph Slate--A rhyming board book. The animals are cleaning in preparation for baby Jesus. My toddler loved this book. A favorite at our house!

Where is Baby's Christmas Present? by Karen Katz-- A lift the flap book. My 10 month old loves these books. She has a series of flap books.

*******Snowmen at Christmas by Caralyn Buehner--Probably my favorite of all my Christmas books. I love the illustrations. It's a story about how snowmen celebrate Christmas. LOVE this book.
One Yellow Daffodil by David A. Adler--Emotional Hanukkah story about a Holocaust survivor invited to celebrate the holiday with a family he barely knows. For older children.

On Christmas Eve by Margaret Wise Brown (author of Goodnight Moon and The
Runaway Bunny)

The Polar Express by Chris Van Allsburg---No synopsis necessary, I'm sure. :)
'Twas the Day After Christmas by Mavis Smith--A lift the flap book about a mouse the day after Christmas.


If you have any other great books in this category, let me know and I'll post a picture and synopsis! I'm always on the look-out for a great book. :)

LinkWithin

Related Posts with Thumbnails