Welcome!

This blog is here for you to find fun learning activities to do with your children. We share great ideas we find and love on the Internet, as well as ideas we come up with on our own! We also like to share resources we find helpful.

To find ideas for your child, click on the age range blog label or on the theme/topic you are looking for (on the left side of the page). In each post, we try to list optimal age ranges for the activity, but you must judge for yourself if it is appropriate for your child. When you try an activity out, please comment and let us (and everyone else) know how your child liked it!
Showing posts with label planning. Show all posts

Monday, September 27, 2010

Home Made Calendar


Doing a daily calendar is a great way to help teach your children about days of the week and help them grasp things like "yesterday" and "tomorrow" and "two weeks."

I made this one very inexpensively. It is far from perfect, but good enough for us! I got a piece of poster board from the dollar store as well as some numbers. You could also print the numbers off. I then put a grid for the calendar days. Then I wrote the days of the week across the top. I put pictures of people on their birthday. I also put a spot for the weather for the day. I printed out some weather clipart (sunny, partly sunny, cloudy, raining, snowing, etc.). I have a spot for the scripture we are memorizing. Then I have the title of the month mounted on some scrapbook paper to offer some color. I might start doing a Spanish vocabulary word and put that up, too.

Each day, we put up the number and I say "Today is SATURDAY September 4, 2010. What is the weather like today?" Then we put up the weather picture. We then recite the scripture. This works well with our Learning Poster.

Thursday, May 6, 2010

Workboxes

Originally explained by Sue Patrick in her Workbox System book, workboxes have become pretty popular in the homeschooling community.

(the above photo is from the Tot School blog and shows the standard way to do workboxes, head on over and check out her posts on how she's implemented Workboxes with her toddler!)

Everybody uses this system differently, but the basic concept remains the same. Your child has work in a box/basket/file/hanging pocket that is to be completed that day. For a toddler you might want to start with just 5 boxes of 'work'. For a preschooler maybe 9 would be a good amount to fill up the learning time. Ideally most of the work contained in the boxes will be activities that your child can complete independently. For a toddler that's just not going to happen completely, so expect to at least supervise each activity.

The benefits?
  • organization
  • structure
  • independence
  • teaches care for toys
  • keeps the learning time moving without constant direction by mom
  • better focus
The limitations?
  • does not work for messy/complicated activities
  • requires more prep time the night before
  • physically finding the space to set up boxes can be a struggle at first
Our experience?

We have only done this 2 days so far (Monday and Wednesday) and I am already loving it! Oh, and Tobias loves it too ;) I fill each box with an activity the night before and the next day when we have a good 1 hour time slot for learning time I tell Tobias we can do his boxes now. He gets each box out, completes the activity as quickly or slowly as he'd like, and then puts everything back in the box and returns the box to its shelf. Then he grabs the next box on the shelf until he's done all five. No clean up for mom, and more independence for my toddler, can you see why I love it? :) Below I have two pictures of how I've set up our workboxes. The containers are photo boxes from Joann's that were $2 a piece. In the second picture you can see today's activities all set inside each box.


How do I get started?

Round up five boxes if you have a toddler, nine if you have a preschooler. You can use anything, shoeboxes, photo boxes (this is what I used), those plastic toy storage bins, etc. Pick a good place for them to go where your child can reach them easily.

The first day, choose easy activities because your focus is to teach your child how to get each box, complete the activity, and put the box away properly. There is to be no throwing or banging of the materials, which is what I mostly had to correct Tobias for. We had two time-outs when he threw a toy and when he refused to put the materials away in the box. He only got off time-out when he was willing to finish up and he did that happily both times without any further discipline. For a toddler, this skill of getting out one toy, playing with it, and putting it away neatly is huge! It's useful for mom, useful for Kindergarten, and useful for the poor toys who take all the typical toddler abuse normally, lol!

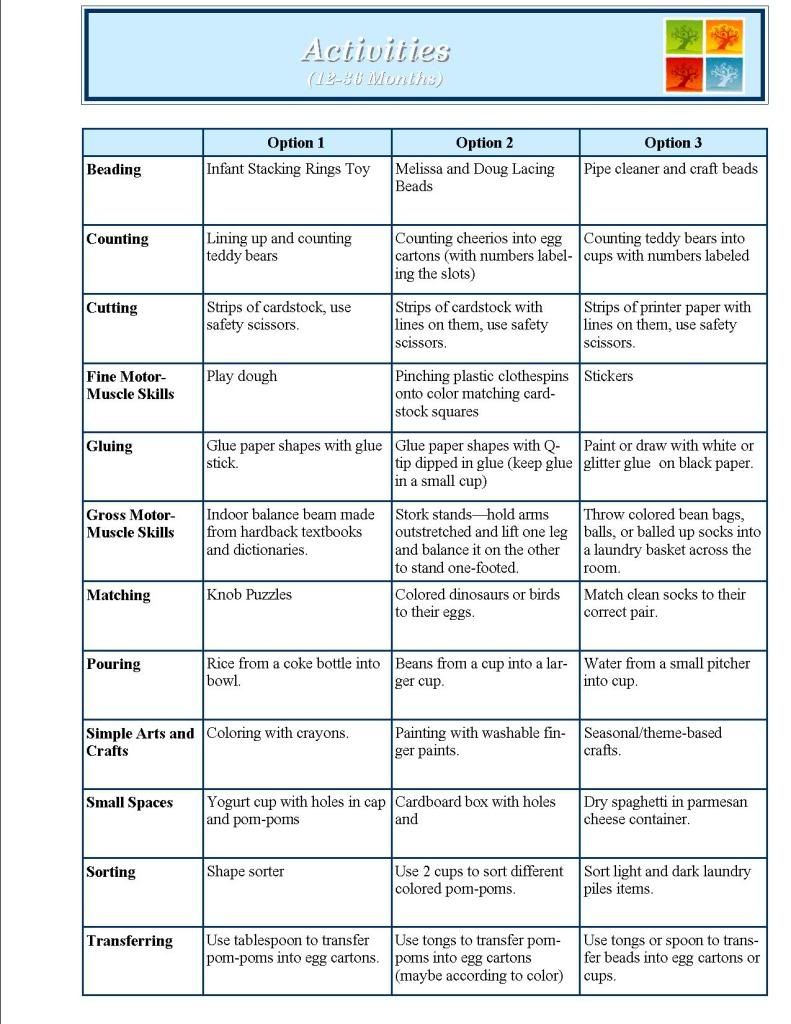
What activities can I put in the boxes?

I am choosing 4 activities that have a clear purpose and 1 that is open-ended right now. The open-ended toy comes last so Tobias doesn't get bored before completing all the boxes. Some activities we've used include:

Counting Bears

Lauri Shape Sorter

Lauri Tall-Stacker Pegs

Small Spaces Activity--we used the puff balls and a yogurt container activity

Transferring Activity--we used wooden toast grabber tongs to transfer puff balls from one basket into another

Cutting Activity--safety scissors and strips of scrapbooking paper worked well (this was very difficult for Tobias so don't be discouraged if your toddler can't do it either)

Stamping--this was great fun, but also a bit of a mess so we might put this away for a few months and come back to it

Coloring--crayons and paper are always fun :)

Thursday, December 10, 2009

Tot School Activity List

I've had difficulty getting my ideas for Tot School into a workable format and really needed a more user-friendly form. So I made this one! Along the left hand column I wrote down several different categories of activities based on the skills practiced. Then I listed 3 separate activities for each category. So if you realize you haven't done pouring in a while and your mind goes blank on activities, it will be easier to reference this list. Click on it and you can see the larger format to read it easier.


I also have a tiny request from anyone reading this blog. Could you state which activities here you have tried and at what age? And then tell me whether your child did it independently, with assistance, or was unable to do it? I'd like to get some more reference points for what the age-range for each activity is so I can make one of these forms for the 12-18 month range, one for the 18-24 month range, and so on. I'll be working my way through these with Tobias but he's only one child and is past the 12-18 month age range already. It would really speed up the process to have other mom's opinions!

Oh, and anyone is welcome to download, print and use this form. I'll hopefully figure out how to get the actual form downloaded in a more share-able format but for now it is simply a picture format and even that took me over an hour to figure out, lol!

Monday, November 30, 2009

Learning Poster

Over 26 weeks this year, I have been following the preschool curriculum found at Our Preschool Homeschool Blog. On it, she suggests doing a learning poster where you can post your weekly learning items.

In our old house (we recently moved), I didn't really have anywhere to hang a poster. Instead, I wrote each item on a piece of paper and hung each paper on cupboards in the kitchen.

When we moved, I now had room for a poster. So I made one. Since we have been using it, I have grown to like it so much that I think I should have tried harder to find a place in the old house. I have since thought of lots of places I could have put it.

Here is how I made it:

SUPPLIES
  • Poster board
  • Computer and printer
  • Scrapbook paper
  • Scissors (I used a scrapbook rotary cutting board)
  • Glue stick
  • Tape (to hang the poster)
METHOD
  1. Type and print (or write out) the headings for each category on your learning poster. Just be sure you don't print each title larger than can fit in its respective columns.
  2. Cut out rectangles to put each item on each week.
  3. Cut out each title.
  4. Glue each rectangle in place.
  5. Glue each title onto scrapbook paper (card stock).
  6. Hang the poster.
WEEKLY
  1. At the beginning of each week, create your items for your learning theme.
  2. I put up the theme picture, vocabulary picture, and nursery rhyme at the beginning of each week.
  3. On each respective day, I add the appropriate picture. So on letter day, I add the printout of the letter.
  4. Each morning, we review all that is on the poster.
PHOTOS
I made mine a bit more colorful than the one on the preschool blog. This wasn't difficult, but more time consuming than it needed to be. In my mind, it was worth it :) Decide for yourself. I didn't worry so much about having perfect spacing around the words.


LinkWithin

Related Posts with Thumbnails