Welcome!

This blog is here for you to find fun learning activities to do with your children. We share great ideas we find and love on the Internet, as well as ideas we come up with on our own! We also like to share resources we find helpful.

To find ideas for your child, click on the age range blog label or on the theme/topic you are looking for (on the left side of the page). In each post, we try to list optimal age ranges for the activity, but you must judge for yourself if it is appropriate for your child. When you try an activity out, please comment and let us (and everyone else) know how your child liked it!

Wednesday, September 30, 2009

Dinosaur Theme Week


Almost all children love dinosaurs at some point. There are lots of fun things you can to for a dinosaur themed learning week. Here are some ideas:

GROSS MOTOR SKILLS
Pretend to be dinosaurs and stomp around the house. You can give your child a dinosaur name based on name (so Brayden is "Braydensaurus") and have him choose a type of dinosaur to be (flying, swimming, land...).

FINE MOTOR SKILLS
Be paleontologists!
  • Put a toy, plastic dinosaur in some water and freeze it. The next day, work on extracting your dinosaur from the ice.
  • Extract bones from the dirt. Put some bones in a baking dish. Cover them with sugar, flour, sawdust, etc. Use paintbrushes to find the bones. You could make some bones out of plaster (you can use a plastic dinosaur to make a plaster of footprints), use sticks or rocks (or whatever) along with the imagination of your child, or purchase a kit like the Scientific Explorer's My First Dinosaur Science Kit. Use a paintbrush to extract the dinosaur bones.
SINGING SONGS
To the tune of "I'm A Little Teapot" (add actions if you want to)

I'm a mean old dinosaur
Big and tall
Here is my tail and here is my claw
When I get all hungry
I just growl
Look out kids I'm on the prowl!

COLOR OF THE WEEK
You really could use any color since we don't know exactly what colors dinosaurs were, but common colors applied to dinosaurs are green, brown, and yellow.

SCIENCE
You could use your fine motor skills to apply to science. You can also get a Giant Dinosaur Hatch'em set. My sister gave one of these to Brayden when he was one, and I just hadn't ever used it yet. When we had dinosaur week last week, I got it out and we watched the egg hatch over a day and the dinosaur grow over a day.

GEOGRAPHY
Show your child a map of where dinosaur bones are primarily found.

ART
  • Dinosaur coloring pages
  • Playdoh: Have your child make a footprint using a toy dinosaur. Let the footprint harden to make a fossil.
LETTER OF THE WEEK
Have your letter of the week be the letter "D." See Letter Picture: D for an idea for a fun activity.

BOOKS
Go to the library and check out books about dinosaurs. If your child really loves dinosaurs, you might decide to buy one to keep around the house: Dinosaur Books. Some I like:
FIELD TRIP
Take a trip to a dinosaur museum.

FUN/FREE PLAY
Get some Dinosaur Figurines and play with them. We own several, and my 4 and 2 year old had a lot of fun with each other playing with the dinosaurs. There was something about it being "dinosaur week" that made playing with them extra fun.

SORTING
You can use your figurines to have your child sort. He can sort them by colors, by his favorite to least favorite, by smallest to biggest, etc.

COMPUTER TIME
pbskids.org has some great dinosaur activities on the Dinosaur Train page: Dinosaur Train

TV TIME
  • Watch movies with dinosaurs (like The Land Before Time)
  • Watch the new show, Dinosaur Train, on your local PBS station
OTHER RESOURCES

Tuesday, September 29, 2009

Fall Craft: Apples & Thankfulness

I was looking for a way to help emphasize being thankful with my toddler. There's such a natural sense of me, me, me that toddlers have, and I want to help Charis learn how it feels and what it looks like to be thankful for the wonderful people in our lives. Here's what we came up with around here.

Materials Needed:
*Washable paint
*Apples (1-3)
*Paintbrushes or sponge brushes
*Blank cards with envelopes


Ages: 2+

Prep:
*Put down paper on the table to keep paint from getting everywhere.

*Cut the apples. One needs to be cut in half, so it keeps it's pretty "apple" shape.


The other apple(s) I cut in half horizontally, so that the shape of the core makes a star. Then I cut the apple around the star, to make an easy to hold square (like a stamper).


*I put paint in individual jars, for easy access for the brushes.
*Lay note cards out flat.
Activity:
1. Show your toddler how to paint the sliced apples. It works better to paint the slices rather than dip them.
2. Show them how to press the apples on the card. It's okay if they wiggle, it's their creation...a piece of them.
3. After they dry, draw (or if your child is old enough, let them) apple seeds and stems on the apples.
4. Keep the note cards handy. It's a good idea to write a thank you or "I appreciate you" note right then. Explain that when you care about someone, appreciate someone, or want to say thank you, it makes their day brighter to get a card.
We keep the cards in plain sight so I can grab one when the opportunity presents itself.
It's never too early to set the example of being grateful. Make sure you do the same, and tell your child when you send a card or call someone to say thank you, I miss you, Happy Birthday, or whatever you decide.

Monday, September 28, 2009

Number Squares

This is a fun, simple activity for working on numbers.

AGE RANGE
I haven't tried this with my 2.5 year old yet, but my 4 year old did very well with it. This is definitely appropriate for four and up. I would guess that most three year olds could do this. If your child is two, you can try it and see how it goes, but expect to give lots of guidance (which is fine).

SUPPLIES
  • Paper
  • Pen/pencil (or you can create on the computer and print)
  • Stickers (you can use stickers that go along with your theme for the week if you have one)
PREP
  1. Make a grid on a paper. Put six squares on the paper.
  2. Put different numbers in each grid. Initially, start with only two different numbers.
  3. Get stickers out.
ACTIVITY
  • Instruct your child to put the correct number of stickers in each grid.
PHOTO

Friday, September 25, 2009

ABC Dog Food

When I was teaching elementary school, I attended a conference by Dr. Jean Feldman. One of the activities that I especially loved (as does my toddler) is Who Let The Letters Out?
This is a great way to teach letter recognition, to review letters that your child knows, and to teach letter sounds.

Materials:
*Bowl (I used a plastic bowl that resembles a dog food bowl)
*Stuffed animal (dog works well)
*Magnetic letters/numbers

Prep:
*Glue a magnet or magnetic tape to the nose of any stuffed animal.
*Pour desired letters/numbers into the food bowl

Activity:
*Let the dog "sniff" and dig his nose around in the bowl. His nose will grab the magnet on the back of a letter.
*Pull his nose out, with a letter stuck to his nose.
*If an "s" comes out, sing "Who let the S out? /s/ /s/ /s/ /s/(make /s/ sound)" to the tune of Who Let the Dogs Out? "M" would be "Who let the M out? /m/ /m/ /m/ /m/!!"
*Repeat for each letter.
*After we finished, my daughter enjoyed having the letters dive back into the bowl, yelling their name or sound. "Here comes O! O! O! Here is the T! /t/t/t/t/"
Extension:

*This can be done with anything you are teaching. Just find a picture of that skill (colors, numbers, shapes, animal names, foods, family members) and put a magnet on the back of it. "Who let Aunt ___ out? Who? Who? Who? Who?"

*For older children, you can extend it and have them sort. For example, if you are working on letters, sort vowels and consonants or capital and lower case letters. Animals, sort by covering (fur, scales, feathers). Family members, sort by side of the family or male and female. The list could go on and on!

Thursday, September 24, 2009

Scheduling Learning Time For All Ages

Since Grandma is in town we haven't done any new learning activities this week but I have been listening to Moms Notes Cd's on structuring your child's day and thinking a lot about how to implement learning time into the day.

Here are some tips for getting started at any age:

- Choose a time when your child is fed and well-rested. Right before a nap or a meal is not the time to introduce a learning time!
- If your child is still doing 2 naps then your ideal time will be after lunch. If your child is taking just one nap each day then you will want to do learning time either after breakfast in the morning or after the nap and a snack. If your child has no nap I would recommend right after lunch as a good time for learning.
- Start with short amounts of time, even just 5 minutes if that's all you think your child can handle. Gradually add 5 minutes each week until you reach your goal.

General Tips for Babies:

Location: keep it on the floor, preferably on a blanket so there is some boundary to the activity.
Duration: 15 minutes is a fine goal for any child under the age of one. You may be able to do two 15 minute learning periods each day.
Types of Activities: expect each activity to last around 5 minutes with infants. You can choose a physical activity, a music activity, and then a reading activity to fill up the 15 minutes nicely.

General Tips for Toddlers:

Location: your learning time can be split so it takes place half at the table or highchair and half on the floor. Again, a blanket can help to give a reasonable boundary to the activity and can be a cue to your child that floor learning time is about to start, not just regular free play.
Duration: every toddler is different, you need to gauge your child's interest, ability to focus, and age on a case by case basis. However, I would say that you can aim for 30 minutes for a 2 year old and 45 minutes by 3 years old. If you want to achieve the longer learning time, please understand you need to vary the activities, they cannot do 1 activity for 30 full minutes. You can also feel free to do two slightly shorter learning periods each day.
Types of Activities: If you have a "sitter" then plan for 2 table activities and 1 floor activity. If you have a "mover" then plan for 1 table activity and 2 floor activities. Choose 3 activities from different categories (craft, fine motor, and music or maybe fine motor, physical, story). This will hold your child's interest and allow you to see where your child's strengths lie.

General Tips for Preschoolers:

Location: at least half of learning time should be at the table and half or less on the floor. Remember, you are preparing them for the larger amounts of sitting time in Kindergarten whether in public school or home school.
Duration: 30-60 minutes. As with toddlers, do not expect them to pursue one activity for an hour, plan enough activities to fill the time you have allotted. You can certainly do 30 minutes twice a day if you choose or do an hour altogether. Dividing the learning time between the table and the floor will be very useful if you have a preschooler who is a "mover". *If your child is in preschool every day any additional learning time should be shortened slightly compared to a child who does not attend a preschool outside the home. You don't want to burn them out so young.
Types of Activities: Again, variety is the key! At this age you can truly delve into math, science, social studies, and reading in addition to music, art, fine motor skills, and physical education. Always plan one more activity than you think you will need for the day just in case! Three to five activities should fill up a one hour time slot. Be careful not to let your preschooler jump through activities too quickly but know that sometimes you'll end up with extra time anyway.

Credit
Moms Notes by Carla and Joey Link
The Tot School Blog by Carisa

Wednesday, September 23, 2009

Letter Picture: D

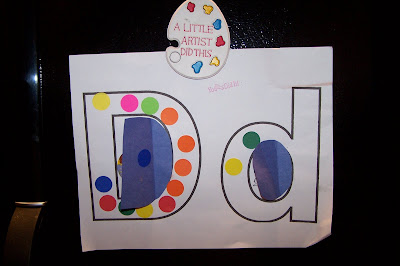
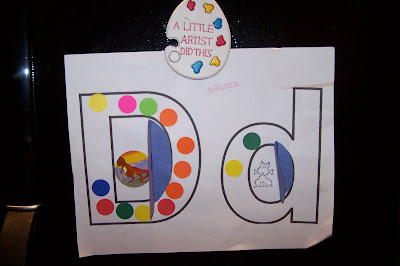
The other day, Brayden (4) brought this home from preschool. This week, they are learning about dinosaurs and it is also the letter D week. I thought it was really creative.

AGE RANGE
I would say this is for the two year old on up. If you have an 18 month old or so who you think would do well with this activity, go for it!

SUPPLIES
  • Picture of a D. They did both uppercase and lowercase. You could do one or both. You could print it or draw it. Here is a link to a block letter: http://familycrafts.about.com/library/color/blcapitald.htm. Or you can make it in Microsoft Word. To do that: (1) Open Word. (2) Go to File>Page Setup. A new window will open. (3) Under Margins, change all margins to .5. (4) Under Orientation, click Landscape. (5) Click OK. (6) Type a capital D and a lowercase d. I would put a space between the two. (7) Highlight the letters. (8) Change the font to Arial. (9) Change the font size to 460. (10) Go to Format>Font. A new window will open. (11) Under Effects, check the Outline box. (12) Click OK. You are now ready to print!
  • Construction paper.
  • Dot stickers.
  • Dinosaur sticker.
  • Dog sticker (or any other "D" word sticker you want to use).
  • Glue.
PREP
  1. Print your D picture.
  2. Either cut out or draw lines for your child to cut out a door for each D (D and d).
ACTIVITY
  • Have your child put a D sticker (duck, donkey, dinosaur, dog, etc.) in the center of the capital D and one in the center of the lowercase D.
  • Have your child decorate the D's with dots.
  • If you want your child to cut out the doors, have him do so.
  • Have your child glue the doors in place to cover the D stickers.
PHOTOS
Here are two photos of Brayden's D picture.


ADDED THOUGHT
You will notice that this picture is hanging on the fridge. You have probably read this a million times, but display the artwork your children do. I hang the kid's pictures on the fridge as soon as they are done (or as soon as the glue dries). I always make a big deal about it.

If you are the type who hates to hold on to stuff and want to throw it away, don't do it in front of your child :) If you are the type who hates to throw stuff away, you can take pictures of it and just keep a few things.

Tuesday, September 22, 2009

Fall : Do-A-Dot


Do-A-Dot Art! is a pack of sponge tip paints/markers that are washable. There are multiple packs, multiple colors, and different coloring books designed especially for these markers. I found our set at Michael's, our local craft store. Here's how we started talking about Fall with our 2 year old.

Ages: As early as they can pound on a piece of paper with these markers. :) I just found them recently, but my daughter would have been able to handle them much earlier.

Materials Needed:
*Book about fall (We read When Autumn Comes by Robert Maas)
*White paper
*Do-A-Dot markers (green, red, yellow, orange)


Prep:
*The night before I painted a bare tree for her to put leaves on
*Choose an appropriate book to teach about fall (or apples).


Activity:
1. Read the story, talking about what happens in the Fall/Autumn.
2. Make sure you point out the changes in the trees.
3. Show your child how to dot on the leaves.
4. Let them stamp away! Try not too be too involved. I have a tendency to want crafts to look a certain way (like actually looking like a fall tree when she's done) but sometimes that takes the fun and creativity away from your child. I just try to keep on on the paper (rather than hands, clothes, or tables).


To do this activity with apples:
*Read an apple book. We read Apples, Apples, Apples by Nancy Elizabeth Wallace. It's a great story about a bunny family that goes to an apple orchard to pick apples. There are graphs that older children would understand, and diagrams of an apple. The farmer explains how apples grow, and at the end of the story there is a recipe, a song, and a painting craft. Apple tasting (red vs. yellow vs. green) is very appropriate with this story.
*Use Do-A-Dot markers to make an apple tree.
*We also talked about the parts of the apple (since there is a diagram). We cut open an apple and used the terms in the book to talk about what each part does, which part we eat, etc (skin, flesh, seeds, stem, leaves).

Extensions:
* For older children, you can fold a piece of paper into 4 squares. Paint a bare tree in each square. Label Spring, Summer, Fall, Winter. Read Arnold's Apple Tree, a great book about the progression of an apple tree through the seasons. Use the Do-A-Dots or a Q-tip and washable paint to dot the leaves, buds, flowers, and snow on the trees.

*For any age group, use animal stamps or stickers and add the appropriate animals to the pictures. You can make it a counting activity as well "Let's add one squirrel. Let's add 2 birds. Let's add 3 blossoms, 4 red apples, etc."

*You can add pictures of people (from a magazine, stick people, real photos) and dress them appropriately for the season. I took pictures of family and just asked her what they should wear to pick apples ("Should Mommy wear a bathing suit in the fall? Should Daddy have gloves? What is the weather like? So since the weather is ____, then he should wear ___.")

*We went to the grocery store and chose one of each kind of apple to taste. She had a great time helping me choose good apples from each display. We later took them home and tasted. I let her take a bite out of each apple to see which she liked the most and to talk about different flavors and textures (sweet, sour, hard, soft, etc). Then I chopped them up and we used the recipe in the book (Apples, Apples, Apples) to make applesauce.

Fall Books

In honor of the first day of Fall...

I thought it would be nice to have a list of books about Fall. I like to reserve books online at the library and just go in and pick them up. That way I don't have to spend as much time digging for books about specific topics! Included are books about apples and pumpkins.

These titles will be updated periodically, as we come across more great resources!

A Tree Can Be by Judy Nayer
We're Going on a Leaf Hunt by Steven Metzger
**When Autumn Comes by Robert Maas (uses photographs)
**The Seasons of Arnold's Apple Tree by Gail Gibbons
One Little, Two Little, Three Little Apples by Matt Ringler
**Up, Up, Up! It's Apple-Picking Time! by Jody Fickes Shapiro
**Apples, Apples, Apples by Nancy Elizabeth Wallace
Sixteen Runaway Pumpkins by Dianne Ochiltree
**Changes by Margorie Allen and Shelley Rotner (uses photographs)
**Picking Apples and Pumpkins by Amy and Richard Hutchings (Uses photographs)
Ten Apples Up on Top by Dr. Seuss

** These books have a good amount of educational information included in the story.

Monday, September 21, 2009

Tried and True: Singing Songs

After posting about the Wheels on the Bus today, I realized I haven't done that much with McKenna (almost six months old) during her lifetime. So this evening, I did it with her. She laughed and laughed and laughed. She loved it.

Kaitlyn (approaching 2.5) played with me. She did McKenna's movements for round two. Then once McKenna was down for a nap, Kaitlyn wanted me to do it to her (the same way I did it to McKenna), then she wanted to do it to me (yes, the same way I did it to McKenna). LOL! You really have to be prepared to do everything you have a toddler do :)

Singing Songs

We have had a lot of requests for ideas for activities with babies, so I thought I would start with a simple one: Singing Songs.

AGE RANGEAll ages. Really. All kids of all ages love to sing and do movements to songs. I still love it :)

SUPPLIES
  • Adult
  • Child
WHEN TO DO IT

All the time, any time. I sing to my kids all the time. We sing while we are driving, we sing while we are playing, and I sing while I am feeding them. I love to sing to my babies while they are eating their food. They are typically quite interested in it and don't try to stick their hands in their mouths or anything.

With my oldest, I found singing songs with actions particularly helpful during the evening. He was a typical baby in that he got fussier in the evening, and my husband was in school and working at the time. He was gone before we got up and got home shortly before Brayden went to bed. I needed all the tricks I could muster up for the day!

SONG IDEA: Wheels on the Bus

There are so many possibilities out there. My favorite (because it is my kids favorite) for a young baby is Wheels on the Bus.

Wheels on the Bus

This was Brayden's favorite. Brayden was my only baby to get fussier in the evenings (McKenna had a witching hour...but I am just talking fussy :) )--probably since he only took 45 minute naps until he was 6 months old. He also hated driving in the car. The Wheels on the Bus saved us every evening and every car ride.

For a baby, lay baby on the floor or another surface you feel comfortable with. For a toddler, have your child face you. Your child might need help doing actions. For the preschooler, have your child face you and mimic your movements.

Verse One: bicycle baby's legs round and round. For toddlers and older, make a big circle with your arm like a wheel

The wheels on the bus go round and round
round and round,
round and round,
The wheels on the bus go round and round
All through the town

Verse Two: Take baby by the hand and have her swish her arms back and forth. You might need to do the same for your young toddler. For the older toddler on up, swish your arms like windshield wipers and have your child mimic.

The wipers on the bus go swish, swish, swish
Swish, swish, swish,
The wipers on the bus go swish, swish, swish
All through the town

Verse Three: You are already holding baby's hands. Gently pull baby up and down like baby is doing a sit-up if baby is old enough to do this. If not, just move baby's arms up and down. For the toddler and older, stand up and sit down.

The people on the bus go up and down
Up and down
Up and down
The people on the bus go up and down
All through the town

Verse Four: On each "beep," gently tap baby's nose. You can do the same to your toddler and older, or you can have your child beep her own nose while you beep your nose.

The horn on the bus goes beep, beep, beep
Beep, beep, beep,
Beep, beep, beep,
The horn on the bus goes beep, beep, beep
All through the town

Verse Five: For all age ranges, put your hands in front of your face with your elbows touching each other. Open and shut the doors when you say open and shut in a peek-a-boo fashion.

The doors on the bus go open and shut,
open and shut
open and shut
The doors on the bus go open and shut,
All through the town

Additional Verses: You can to so many different things with this song. I have sung this song enough times to have an endless supply up my sleeve:
  • Babies on the bus go wah, wah, wah (put finger on baby's chin and move mouth open on wah. For toddlers and older, make a wah-ing motion where you roll your hands in front of your eyes like you are crying)
  • Mommies on the bus go shh, shh, shh (shh your baby's mouth with your index finger or shh your own mouth for older children)
  • Driver on the bus says move on back (take baby's arms and move from one side to the other. For older children, move your arms in a "move back" motion).
  • Girls on the bus go giggle, giggle, giggle (tickle all ages. Be gentle tickling a baby and watch for signs baby doesn't like it. If not. Just pretend to tickle)
  • Boys on the bus say let's go play (hold baby's hands and move one arm up then the other, or bring them together in front of baby and then spread out in a Y form. For toddlers and older, jump up and down or spin around excitedly)
  • Road under the bus goes bump-ety bump (if baby is on a soft surface, you can bounce the bed. You can also put baby on your lap and move your legs up and down. You can also put a young toddler on your lap. For older toddlers and up, jump up and down)
This is just one example of how you can make a simple song into a fun, gross motor skills activity. You can add verses and make up your own actions. I just made these all up, so anything you can think of will be fun. Children are easy to please.

Children love singing and they love moving around. This is a great way to distract a fussy baby or to just have fun with a baby. I know it is simple, but baby does learn a lot from it. It moves baby's body, it exposes baby to music, and it gives baby fun time with the parent, which all babies love :)

Saturday, September 19, 2009

Bean Bags

This is a good activity for any age child so long as the bags are securely sewn and the beans won't fall out. You can do colors for toddlers and practice counting the bean bags. For preschoolers you can make or purchase alphabet bean bags and practice letters.

Supplies

-4.5 inch squares of fabric in various colors (2 of each color)
-Basic Sewing supplies (machine, thread, etc.)
-small beans or lentils
-or purchase bean bags

Prepping
-Sew 3 sides of the 4.5 inch squares together to make a pocket
-Fill with beans (don't fill too much, your fingers should barely be able to touch if you pinch the middle of the full bag)
-Sew open end closed

Activities

Colors: Place the bean bags on the floor near your child and as him/her to give you the blue one. Start with just 2 colors and progress to picking out one color out of 4 or 5. Infants and Toddlers also enjoy putting them in and out of boxes. An old shoe box with a hole cut in the top is very useful for this purpose and lets them take the lid off to get the bean bags back out. (supervision required for children under 3)

Gross Motor: Set out a laundry basket at one end of the room and ask children to stand at the other end and toss the bean bags in. They can also do a relay race with 2 cushions between them and the laundry basket. They must run and jump over the cushions, place the bean bag in the basket, and then come back to get a second bean bag for the basket. To reinforce colors and reading for preschoolers you can use different baskets/boxes, each with a different color word on it and they must get the correct bean bags in each labeled basket/box.

This can be a wonderful rainy/snowy day activity to get the kids up and moving.

Photo

Friday, September 18, 2009

Ice Painting

Painting is always a fun activity for toddlers, preschoolers, and school-aged children. I'm not always a huge fan of the mess, though.


My toddler loves to play with ice. She is fascinated by it. When I was looking through The Toddler's Busy Book by Trish Kuffner, I found Ice Cube Painting. I didn't have the recommended tempera paint, nor was I ready to deal with that kind of mess. I also needed a 5-10 minute activity.

So, this is what we came up with:

Materials Needed: Ice cubes (You can even take a Popsicle mold or Ice Cube tray and stick and freeze them with popsicle sticks in them), Paint With Water book, baking sheet with a small lip on it, blanket/towel, small bowl to put ice in.

Directions:

1. Place towel on the floor. For older children this may not be necessary. However, with my toddler, she has to keep this activity on the towel.

2. Put the cookie sheet down, tear out one Paint with Water page.

3. Instead of painting with the paintbrush, let them paint with the ice cube. Have fun!


Thursday, September 17, 2009

Shaving Cream Trays

Another great activity for toddlers, preschoolers, and school-aged children is Shaving Cream Trays. We used to do this activity in both Kindergarten and First Grade to practice letter, number, and shape formation. This is a great way to practice fine motor skills. For very young children, it's beneficial to simply practice making straight vertical lines, starting top to bottom. This is a great way to prepare them and strengthen muscles needed for letter formation.

Age Ranges: 1+ (I started around 2, but my daughter likes to put pretty much everything in her mouth)

Supplies Needed: Non-toxic shaving cream (pudding is a good substitution for very small children that might put the shaving cream in their mouth), table or cookie sheet.

Directions:

1. Put a big blob of shaving cream or pudding on the cookie sheet.

2. Show your child how to spread it out to make a drawing surface.

3. Let them draw! Show them how to "erase" and start again.

4. Shaving cream disappears the more they play in it, so eventually it will be gone. It only requires a quick wipe-down of the surface afterwards.

Extensions:

*For older children, call out letters or numbers to write.

*You can do this with your children. On your own cookie sheet, write a letter or number and have them guess.

*This also works for math problems!

This is my daughter at 25 months working on this activity.

Wednesday, September 16, 2009

Color Cards

This activity is to help children learn colors. Both my four and two year old enjoy this game.

SUPPLIES
  • Colored paper (scrapbook, construction, etc.)
  • Scissors or some way to cut paper
  • Pen/marker or alphabet stickers (you could even use a label maker)
  • Contact paper or laminating machine

PREPPING
Photos below.

  1. Cut two sets of cards out of each color of paper you want to do. You can cut the paper to any size you want.
  2. Write the name of the color on the card if you want to.
  3. Cover each card in contact paper or laminate each card.


ACTIVITY

  1. Spread the cards out on the table. The number of colors you use at a time needs to be dependent on your individual child. For the younger child, start with two colors. For the older child who is better at colors, add more.
  2. Pick up a card and say, "I have a red card. Can you find the other red card?"
  3. At some point, you can mix the game up. You can give your child one stack of cards and spread out the matches. Have your child go through the stack and match the cards up. You can also have your child name the color. You can also let your child be the quizzer. These cards could also be used as color flash cards.
MY THOUGHTS
  • Paper: I used both scrapbook paper and construction paper. I prefer the scrapbook paper because it is more sturdy.
  • Contact Paper/Laminating: If you have lots of children (or even one child who will be slightly destructive), I would definitely cover the cards with contact/lamination. It will take some extra time now, but will prevent you from making new cards over and over again.

PHOTOS
Here are some photos of the finished product.


VARIATION
I used these cards to do the ABC Relay as posted by Raegan (ABC Relay). It was a big hit! We also played hide and go seek where we hid the cards around the room for each other to find. These cards were a lot of work to make, but they have already served many purposes in the two weeks we have had them.

CREDIT
I got this idea from the Toddler's Busy Book on page 191. For more on this book, see Book Review: The Toddler's Busy Book.


Tuesday, September 15, 2009

ABC Relay

Once you've started working on the alphabet with your toddler or preschooler, it's always nice to find fun ways to reinforce what has been learned. And if your toddler is like mine, burning energy is always a plus!

Ages: 1+ (I started at 18 months)

Supplies needed: Alphabet cards (like flash cards). I put magnets on the back of mine. Small basket or bucket. Even a bowl will work.

Prep Work: Hang random alphabet letters at one end of the room. I stuck mine to the fireplace since they would stick with magnets. Two will do if you are just starting. My daughter is 2 and knows her alphabet, so we do 5-8 at a time. Any more than that seems to be visual clutter for her. As she gets older she should be able to handle more letters at one time.

Activity:
1. After your letters are in place, start your child at the other side of the room. Explain that you will call out a letter and their job is to go and find the letter, grab it, run back to the "start" position and throw it in the basket.
2. Demonstrate for them.
3. You place them at the place to "start" (mine was a chair), say something like, "You are looking for the letter Y. Look for the letter Y, but don't move. When I say go, you run and get it. Ready, set, GO!"
4. They run and get it, cheer for them, repeat the letter again and again, and remind them of the goal while they are running. ("Look for the Y! Do you see it? Find the Y! Grab it! Good job! Put it in the basket!)

Variety:
*You can do this with numbers, shapes, colors. You can also make it more difficult by trying sounds with older children instead of the name. (Find the letter that makes the ssss sound.) Or look for the letter that is at the beginning of the word "dog."

*Another way is to incorporate a new movement. Dance to the D. Jump to the J. Skip to the S. Crawl to the C. Twirl to the T.

Monday, September 14, 2009

Shape Pictures

This is a pretty simple activity and can be done with many ages, though the 2-6 year olds seem to like it best. This can be a great way to teach that everything in our world is made up out of shapes. It can also give great satisfaction to a child who struggles with coloring real pictures because all they need to do is glue and paste to create a neat picture.

Supplies:

-construction paper/foam paper
-scissors
-glue/glue stick
-paper

Prepping:

-cut out shapes from the construction paper or foam paper. Try to use different colors and a couple different sizes of things to allow for more versatility. You can also make shapes certain colors based on what you anticipate the child making. For example, I cut out black squares to make car tires and green circles for tree tops.

Activity:
1. Show the child the shapes and briefly introduce what each shape is called.
2. Demonstrate how to make a simple house with a square bottom and triangle for the roof. Let the child help you and make suggestions. (the child I was working with wanted a chimney on the roofs so I had to cut a rectangle for a chimney)
3. Invite the child to make his own house and then invite them to make other things.
4. Glue the pieces to the paper once you know what picture you want to make.
5. Set pictures aside once complete so the glue can dry properly.

Photo:

Here is an example of what I did with my shapes.

Friday, September 11, 2009

Fun With Small Spaces-Cotton Balls

I got the idea for this activity at the Tot School blog. This is an ideal activity for a child ages 10-24 months. It could even be made more difficult by asking your child to sort the puff balls by color in 2 separate containers or asking him/her to count the balls as they are pushed in the container.


Supplies
-cotton balls or puff balls (can be found at Target or a local craft store)
-clean plastic container with lid (I used a yogurt container)
-scissors

Prepping
-Cut very small holes in the lid of the plastic container. Be sure they are small enough that it takes a little push to put the cotton ball through but not so tight that it will be impossible. Feel free to make slightly larger holes for younger toddlers.


Activity

-Set out plastic container with lid on it and a handful of cotton balls.
-Demonstrate how to push the cotton balls through the small holes on the top. Let your child join in when he/she wants to.
-Sit back a bit and allow your child to investigate it on his/her own. If he/she loses interest join in again so it's more fun as a group activity.

Photo
Here is my son playing with this activity. He absolutely loved it because he is always looking at how things work. Any child who seems to learn well through sensory activities will enjoy this as well. After playing with it the proper way we dumped all the cotton balls out again but he decided dumping the balls out was just as much fun as putting them in. He had a great time dumping them out and putting them back in on his own :)


Thursday, September 10, 2009

Apple Unit for Toddlers

First Week of September: Apples
*I did these activities last week with my pre-toddler (14 months)

Writing/Fine Motor: Color a picture of an apple with a red crayon or red color wonder marker *this will mostly be random scribbling and/or chewing on the marker and that's fine :)

Music/Math: Sing Ten Little Apples by Patricia Morrison
(sung to tune of Ten Little Indians)

One little, two little, three little apples
Four little, five little, six little apples
Seven little, eight little, nine little apples
Ten little apples red.

Ten little, nine little, eight little apples
Seven little, six little, five little apples
Four little, three little, two little apples
One little apple red.

Reading/Math: Read Ten Apples Up on Top by Dr. Seuss

Gross Motor Skills/Science: wash apples in the sink (you can fill up the sink with water and watch for whether the apples float or sink). Allow your toddler to really help scrub the apples with a little vegetable scrubbing brush to get the full gross motor skills benefit.

Vocabulary/Foreign Language: Apple, Red, Manzana(apple in spanish), Rojo(red in spanish)

Optional Field Trip:
Go apple picking at a local orchard!

Tuesday, September 8, 2009

Find The Letter

This is a fun activity to help learn letters. Valerie has done it with her four year old and he really loved it. It adds fun to the "quizzing" of letters. This is meant for the 3-5 year old, but if you have a child younger than that who knows letters, go for it.

SUPPLIES
  • Paper
  • Scissors
  • Pen or Marker
  • Three cups

PREPPING

  1. Cut out circles of paper that will be small enough to hide under your cup. I have a circle punch I use for scrapbooking, which made this very easy to make. If you don't have a punch, you could trace circles onto paper. You could also just make squares small enough to fit under your cup.
  2. Write different letters on each piece of paper. I wrote the uppercase letter on one side of the circle and lowercase on the other side of the circle. If you don't like your handwriting, you could use alphabet stickers.

ACTIVITY

  1. Set out three cups on the table.
  2. Place a letter under one of the cups.
  3. Have your child guess which cup the paper is under.
  4. Have your child identify which letter it is once he finds it.
  5. Take turns hiding the letters. My son's favorite is hiding the letters for me to find.

PHOTO
Here is a photo of the letters I made. I have shown both upper case and lower case letters:


CREDIT
I got this idea from the Preschooler's Busy Book by Trish Kuffner, page 118. For more about this book, see Book Review: The Preschooler's Busy Book .

Monday, September 7, 2009

Meet Your Authors: Amanda

Hello, my name is Amanda, or Manda. I have a 14 month old boy Tobias and I've been married to my wonderful husband Kyle for 2.5 years. We move a lot and always have a lot going on so I have become quite adept at keeping organized in the midst of chaos :)

I have a bachelor's in English Education and am certified to teach grades 6-12 in Georgia. Shortly after graduating I got married and moved to Arizona so I ended up teaching in a school outside my certification. I taught a Kindergarten-First grade class for one year before having my son. I have also nannied for several children ages birth-8 years old for the past 6.5 years.

We will be homeschooling our children, God willing, for their Elementary school years. I believe that whether children go to school or not the most influential teachers they will ever have are their parents. I also believe learning begins from birth and there is a lot we as normal, everyday parents can do to give our children the tools to succeed.

Wednesday, September 2, 2009

Meet Your Authors: Raegan

Hello, my name is Raegan. I am the mother of two girls, Charis (2) and Atalie (7 months). I am currently a stay-at-home mom, but work part-time as the Children's Director for our church. I have been married for 5 years and love being married. We have a 112 pound doberman that adds a bit of "fun" (or chaos) to the mix.

I have a degree in English and am certified to teach PreK-6th grade. I taught elementary school before deciding to stay at home with my children. I miss the classroom but love bringing elements of the classroom home for my girls to enjoy.

Learning is supposed to be fun. I'm excited about the opportunity to share new ideas, concepts, and ways to make learning exciting for our kids! Let the ideas roll...

Meet Your Authors: Valerie

Hello, my name is Valerie. I am a stay at home mom to three beautiful (of course!) children. They are Brayden (4), Kaitlyn (2), and McKenna (5 months). I have been married to my wonderful husband for the last 5.5 years. I have a BS in English with an Emphasis on Technical Writing.

I love knowledge and love teaching my children. Brayden recently started attending preschool 3 days a week for 2.5 hours each day. I still continue teaching him stuff at home and working on skills for him to improve on. I do a preschool curriculum for both Brayden and Kaitlyn at home.

I am also the author of the blog Chronicles of a Babywise Mom: http://babywisemom.blogspot.com/

Tuesday, September 1, 2009

Science Links

Here is a list of links for help teaching science concepts:

Preschool Learning Links

Here is a list of links for teaching your preschooler:

Montessori Links

Here is a list of links for teaching Montessori style:

Middle School/Jr. High Links

Here is a list of links you might find helpful for children in the age range for middle school and jr. high school:

Math Links

Here is a list of links to help your child develop math skills. This includes things as simple as recognizing the numbers 1-9:

Literature/Literacy Links

Here is a list of links to teach literature and reading skills. This includes things as small and simple as teaching the alphabet:

Gradeschool Links

Here is a list of links to help your gradeschool age child:

Art Links

Here is a list of good websites that have fun art activity ideas:

LinkWithin

Related Posts with Thumbnails