Pages
▼
Friday, January 29, 2010
Let's Play Marbles...kind of...
I always thought of marbles as an older child's game. That is, until my 2 year old saw a picture of a marble and said "What's that?" So I proceeded to explain what it was, how the game worked, and even pulled out my bag of marbles to show her.
She was fascinated. So I changed the game a little (or a lot) and made it a 2-year-old-coordination-friendly version. I can barely flick that thing the right way, let alone show Charis how to do it.
Here's the scoop:
Ages: As soon as you are sure the first thing they won't do is try to eat it. My 12 month old is too young. At 2.5 Charis is not ready to do this without supervision. I'll let that be your call.
Supplies: marbles (I have 2 large and a bunch of small), ribbon or yarn.
Directions:
Make a circle with the yarn or ribbon. Put all the small marbles inside. We talked about inside and outside. The object of the game is to roll or bounce the large marble and try to knock as many small marbles out of the circle as possible. We worked on being gentle, aiming, and getting a little strategy going. When she rolled/tossed/bounced hers, we counted the number of marbles she knocked out each time. Then we did the same with my marbles. She wasn't interested in keeping score, but rather just seeing how many she could knock out.
Skills:
counting, shapes (circle), hand-eye coordination, concentration, taking turns, patience
This proved (for us) to be a great lesson on taking turns. She so badly wanted to keep knocking them out over and over and made a disgruntled face each time it was my turn. :)
Thursday, January 28, 2010
New Blog Button
You might have noticed that we have a new blog button! This is a great tool to link up to us from your family's blog or a learning blog of your own so we can all stay connected and share ideas.
If you want to, you can copy and paste the code for it and add it to your blog.
If you have blogger:
If you want to, you can copy and paste the code for it and add it to your blog.
If you have blogger:
- Go to layout > Add Gadget
- Then you click on HTML/Java Script
- Then copy and paste the code in!
When people click on the button, it will take them to our blog.
Wednesday, January 27, 2010
Teaching Baby Letters
This idea evolved over a few days. We have these Sassy Counting and Spell Bath Appliques. McKenna (9 months old) likes to play with them during her bath. After bath time, I let her hold on to one as I take her to her room and get her dressed. She has eczema, so I spend at least 15 minutes just on lotioning her after a bath, so I really have to provide her with things to keep her happy and still while I do so. And thus, this activity was born. It can be done anytime, but I think just at each diaper change will give you plenty of practice time.
AGE RANGE
I would start this as soon as baby is old enough to hold on to these letters. Activities are hard with babies because you don't see results as quickly as you do with toddlers, but I promise the day does come when you see the fruit of your labors. This would be appropriate for as long as your child is in diapers, and perhaps at times even beyond that.
SUPPLIES
I am going to assume you are doing this at the changing table, but you can do it anywhere.
EXTENSION
As your baby grows into a pre-toddler, you can add things like what the letter stands for. "This is a B. The be says 'buh.' Be is for Bear, and Ball, and Brayden."
As your pre-toddler starts to talk more, you can ask her to repeat a word B is for.
As your pre-toddler moves to toddler age, you can give her a few words and ask her which on starts with B. You can also ask her to think of a word that starts with B.
CONCLUSION
This is a simple activity that can both make diaper changes a little easier for you and teach your child about the letters of the alphabet!
AGE RANGE
I would start this as soon as baby is old enough to hold on to these letters. Activities are hard with babies because you don't see results as quickly as you do with toddlers, but I promise the day does come when you see the fruit of your labors. This would be appropriate for as long as your child is in diapers, and perhaps at times even beyond that.
SUPPLIES
- Sassy Counting and Spell Bath Appliques (or any letter that is safe for your baby to hold and suck on--you know she will suck)
- Baby
- Parent
I am going to assume you are doing this at the changing table, but you can do it anywhere.
- Choose a letter to store at the changing table/station. Choose a letter your baby can possibly say. For example, most baby start babbling consonants such as "d", "m", and "n"--not "q", "v", or "t". Choose a letter appropriate for your child.
- Place baby on changing table.
- Hold up the letter. Let's say you are doing B. Hold the letter so baby can see it and say, "This is a B. The B says "Buh." One of my favorite letter movies--okay, my absolute favorite--LeapFrog: Letter Factory has a catchy tune for what each letter says, "The B says, "buh" the B says, "buh." Every letter makes a sound. The B says, "buh." I sing this song.
- Then give the letter to your child.
- As you are changing the diaper, say "Buh-buh-buh" over and over as your child shows interest.
- Change the letter as desired, but don't think you need to do it often. You can stay on the same letter for as long as your baby shows interest in it.
EXTENSION
As your baby grows into a pre-toddler, you can add things like what the letter stands for. "This is a B. The be says 'buh.' Be is for Bear, and Ball, and Brayden."
As your pre-toddler starts to talk more, you can ask her to repeat a word B is for.
As your pre-toddler moves to toddler age, you can give her a few words and ask her which on starts with B. You can also ask her to think of a word that starts with B.
CONCLUSION
This is a simple activity that can both make diaper changes a little easier for you and teach your child about the letters of the alphabet!
Monday, January 25, 2010
Sunshine Award
The Sunshine Award is awarded to bloggers whose positivity and creativity inspire others in the blogworld.
We wanted to pass this award on to twelve other blogs in no particular order:
The first ten have great learning time information:
Preschoolers and Peace
1+1+1=1
No Time For Flashcards
By Sun and Candlelight
Preschool Homeschool
My Montessori Journey
Read 'Em And Leap
Productive Parenting
Heart Pondering
Wilson Ramblings
And two other blogs that just help us be creative moms:
Make It And Love It
The Pioneer Woman
The rules for accepting this award:
- Put the logo on your blog or within your post.
- Pass the award onto 12 bloggers.
- Link the nominees within your post.
- Let the nominees know they have received this award by commenting on their blog.
- Share the love and link to the person from whom you received this award.
Friday, January 22, 2010
Tub Painting
When you've been trapped inside due to weather or for whatever other reason, sometimes you need to liven the routine up a little. We've been known to throw in an extra bath time during the day. Nothing like a little body painting to chase away the midwinter stuck-inside-too-long blues. At least that's the motto in this house. :)
An easy (and cheap) way to make bath time, day or night, a little more fun is to make bath finger paint.
I let Charis help mix it together using measuring spoons. The measurements don't have to be exact. I add more or less of any ingredient to get the consistency of finger paint.
Recipe:
1 T cornstarch
2 T liquid soap (shampoo, body wash, etc)
food coloring
Mix cornstarch and soap together. I usually double or triple the recipe. Then add a few drops of food coloring to get the desired color. Last time I did it I did 2 T cornstarch and 3 of soap and it turned out fine.
So far it hasn't stained anything and washes off the walls perfectly. Great time to work on colors or cause and effect from mixing colors!
Thursday, January 21, 2010
Learning While Traveling-Scheduling for Car Trips
In my last post I listed my picks for best traveling toys. I chose those toys particularly because they fit well into my idea of how activities should be scheduled during traveling. And yes, I do keep a schedule while traveling :) I create a simple document in Microsoft Publisher or Word that outlines our trip so I can calculate driving time and where we'll need to make meal and hotel stops. We've driven places where you can go 50 miles without seeing a gas station or Mcdonalds so I quickly realized the value of planning stops ahead of time!
During any long car trip you want to schedule in as much gross motor activity as possible. Young kids can quickly get frustrated, bored, and cranky being stuck in a carseat for hours on end.
-plan to drive in 2-3 hour chunks of time
-during stops: feed, change diaper, allow for 5 minutes of cuddling/tummy timy
-in the car: provide soft toys and a mirror, play softer music or white noise cd when it's time for sleep. Do Not Over-dress! Newborns have an easier time regulating their body temperature to warm up than to cool down for the first 3 months. When in doubt, dress them lightly and tuck a blanket in around them afterwards that can be removed. Newborns sleep a lot (thankfully) and that is why traveling with them is relatively easy.
Traveling with the 6-12 month crowd is a bit trickier, especially if they have discovered crawling/walking:
-plan to drive as much as possible while they sleep! This can mean 4 hours of daytime driving and 5 hours of nighttime driving after bedtime (7pm-12am). I do not recommend driving all night unless one parent can sleep in the car, otherwise you will be two cranky and tired people the next day.
-keep a routine:
During any long car trip you want to schedule in as much gross motor activity as possible. Young kids can quickly get frustrated, bored, and cranky being stuck in a carseat for hours on end.
- get kids outside before you even leave for the trip
- plan for as much driving while kids are sleeping as possible
- practice patience
- practice patience
- practice patience
-plan to drive in 2-3 hour chunks of time
-during stops: feed, change diaper, allow for 5 minutes of cuddling/tummy timy
-in the car: provide soft toys and a mirror, play softer music or white noise cd when it's time for sleep. Do Not Over-dress! Newborns have an easier time regulating their body temperature to warm up than to cool down for the first 3 months. When in doubt, dress them lightly and tuck a blanket in around them afterwards that can be removed. Newborns sleep a lot (thankfully) and that is why traveling with them is relatively easy.
Traveling with the 6-12 month crowd is a bit trickier, especially if they have discovered crawling/walking:
-plan to drive as much as possible while they sleep! This can mean 4 hours of daytime driving and 5 hours of nighttime driving after bedtime (7pm-12am). I do not recommend driving all night unless one parent can sleep in the car, otherwise you will be two cranky and tired people the next day.
-keep a routine:
- eat solid foods, clean up
- independent play-fine motor skills, stacking, sorting
- play with parent-reading, pretend play, drawing, singing
- pit stop-diaper change, tummy time/crawling, nurse/bottle
- sleep (1-2 hours, expect a shorter nap than normal)
- toddlers take 1 longer nap, so the day's schedule moves from the cycle of activities and into a normal schedule based around mealtimes.
- there is no need to stop for toddlers to eat, unless they are still nursing. Most foods can be eaten in the car, though I recommend a parent sit in the back seat to supervise.
- toddlers need a longer time to stretch their legs outside the car.
- toddlers can be a lot more vocal about wanting to be all done with the car, prep them before traveling by practicing quiet sitting time each day, working up from 5 minutes to 20 minutes. Give them a pile of books or some crayons, they may play or not but need to stay on the couch/chair.
- take more frequent, but shorter breaks to provide opportunities to go to the bathroom.
- plan gas stops/meals to coincide with potty breaks so you're not stopping unnecessarily.
- bring more toys/books and bring kid cd's to play in the car
- consider using a portable dvd player or iPod to play a movie at some point during the trip when you anticipate your kids getting antsy.
Wednesday, January 20, 2010
Snowman Rice Krispie Treats
I got this idea from the Preschooler's Busy Book and added some decorations for fun.
- Make a batch of Rice Krispie Treats.
- Put coconut in a bowl.
- Spray hands with cooking spray or wet with water.
- Have your child roll three balls for the snowman.
- Have your child roll the balls in the coconut.
- Stack balls on top of each other to form the snow man.
- Put eyes, nose, buttons, arms, etc. on snowman. We used chocolate chips for eyes and buttons, pretzels for arms, and candy corn for noses.
We made three snowmen then put the rest in an 8x8 pan for normal treats.
Tuesday, January 19, 2010
Slippery Roads: A science lesson
In our neck of the woods, we don't see much snow. Ice, however, seems to be a winter staple. School is canceled much more frequently for ice than for snow and the roadways here see their fair share of accidents and chaos thanks to the slippery sheets of mayhem.
A fun activity to teach about the effects of salt on ice is just a baking sheet away!
What you'll need:
A fun activity to teach about the effects of salt on ice is just a baking sheet away!
What you'll need:
- rimmed baking sheet/cookie sheet
- water
- Matchbox cars or something of the like
- salt (table salt is fine!)
- freezer
- ice
- sandwich bag
To prep:
- Fill a baking sheet up with a thin layer of water. Place in freezer and let it freeze completely.
- Put ice cube in a bag.
Activity:
- I started by filling an ice tray with her and freezing it. This way she could see that ice is just frozen water.
- Give a bag with 1 cube of ice. Let them roll it around. Instruct them to rub it, blow on it, etc. Ask questions like, "What is happening to the ice? Why do you think it's melting?" Make sure you explain after that it was the heat from the air and their hands that helps it melt.
- Pull out tray of frozen water. Let them roll and skid cars across it. Point out how slippery it is, asking what would happen if there was ice on our roads outside? If there isn't heat to melt the ice, our cars would slip.
- I then made comments like, "I wonder if we can put something on the ice to help it melt. What do you think?"
- If desired, try other items in the house like cornstarch, flour, cocoa powder. Let them pour salt on the ice. Make observations together about what happens when the salt is put on top of the ice.
- Let them roll the cars. You should find some traction, as well as the ice melting. Explain that we also put salt on the roads to help melt the ice and keep cars from slipping. Point it out next time you see it!
This is a fun activity to do, especially if your kiddos are into cars.
Monday, January 18, 2010
Snowball Fight
I was going to try to do all of my snow ideas in one post, but I won't. Why? I live in a cold climate with lots of snow, so we will be learning about snow all month long. If I wait until the end of the month for it all, it will A) make for one very, very long and overwhelming post and B) be too late for those of you living in warmer climates to possibly apply...and I am jealous of you :)
I got this idea from my children. They come up with lots of fun ideas on their own--two heads are better than one :)
AGE RANGE
Old enough to enjoy being a bit crazy...probably about 1 or so. It goes on up to adulthood if you are willing to be crazy.
SUPPLIES
I got this idea from my children. They come up with lots of fun ideas on their own--two heads are better than one :)
AGE RANGE
Old enough to enjoy being a bit crazy...probably about 1 or so. It goes on up to adulthood if you are willing to be crazy.
SUPPLIES
- People
- Tissue paper
- Take your tissue paper and crumple it up into lots of balls. Let the children help with this part--they will love it! This could be a fun activity to do following a big present unwrapping day.
- Throw them at each other. You can make forts to hide behind using couch coushins.
- Once they are all thrown, gather them up and start all over again.
Friday, January 15, 2010
Life Skills
I don't think learning always has to be about knowing letters, numbers, how to read, or something you actually have to sit at a table and practice. I try to remind myself that learning comes in lots of different forms. It's not just my job to help my children learn academic skills, but also life skills. I remember growing up my dad would always say that his responsibility was to see down the road for me as best he could, and to help me grow into a great all around person. So I try not to accept things about my girls as permanent. Maybe she can't sit still well for extended periods of time. Some of it is age, and maybe some of it is that I need to help to her help herself. They can't focus? Ask yourself what you can do to help them learn this skill.
I find that a lot (some legitimately and some not) is blamed on age and/or personality. I remember my world changing when I walked in to observe a Montessori classroom when I was a public school teacher. The kids were working on academics and real life skills. Math, letters, but also things like pouring their own snacks onto a glass plate and washing it when finished. Or hanging clothes up on hangers and putting them in a little closet.
So aside from academics, what kind of real life skills can you help your child learn? I'll be you'd be surprised what a 2 year old (or even an 18 month old) can do.
I've had to abandon some of my type A personality and let some things go. It's not going to look like it would if I had done it. But eventually, with practice, it will be great. Or at least to a point where you don't feel the need to go behind them and fix it.
Here's a list of things I allow Charis to do around the house. Feel free to add to the list! I'd love some new ideas!
1. Her most recent favorite....Peeling hard-boiled eggs!! They look a little crazy when she's done, but I usually use hers for egg salad or something anyways. Great fine motor activity and focusing skill.
2. Scraping her plate when finished. If your child can carry a plate, you may want to let them try scraping it into the trash when finished with dinner. It takes some skill and hand strength (and likely some help from you) to balance and scrape at the same time.
3. Rinsing plates. While I stand with her, she rinses plates off in the sink and then passes them to me. I then put them in the dishwasher. She adores playing in running water.
4. Reverse #3. I rinse and she puts in the dishwasher. This one is tough b/c it requires some hand-eye coordination to get the plates in the right place so they aren't laying flat.
5. Passing me the clean dishes from the dishwasher.
6. Sorting the silverware. I remove all knives and sharps first and then let her sort. I showed her the places where they go, and then let her try.
7. Measuring and pouring soap into the washing mashing.
8.Do you have a salad spinner? Let them spin the salad greens dry!
9. Putting the salad together. I separate all the parts (tomato, greens, cheese, etc) and let her design the salads.
10. Feed the dog! (or cat, bird, whatever) I put a cup in the dog food container and let her scoop it out. Our pup is happy to clean up any spills! I also let her carry the empty water dish to be refilled.
11. Set the table- Yes, this includes breakable glasses and dishes. I set them on the counter and she carries them one at a time to the table. RESIST the urge to straighten things up. The first few times all the plates ended up at one end of the table and silverware haphazardly laying around. She was proud. That's what's important.
12. Making hot chocolate-A winter favorite! We've made it almost a tradition. You can let them squeeze the chocolate and mix. We do a stove top version with cocoa powder, honey, and vanilla. You can also choose a number and count that many marshmallows on the top! It's fun for them to help scoop and whisk. And really, can you have too much chocolate? It's one of those things that's hard to mess up.
13. Dipping bread for french toast! Fun, but messy! Whisking eggs? Serving up the plates?
14. Clean the floors. When I mop, I give Charis a sponge and container of hot water. She loves this.
15. Choosing the vegetable for the night. A fun way to get them involved in meals. Just the other day my 2 year old chose broccoli to go in the pasta and ate it. Success! I just said "Should we have ____ or ____ with dinner?"
16. Sort the laundry- There's lots of versions based on skill. Have them find all the socks and put them in a pile. Can they find their clothes? Just shirts? Carry hangers? Carry the clothes to the correct room? Sort by family member?
17. Load the dryer- I set wet clothes on the dryer door and she pushes them in. I also let her push the start button.
18. Help dust, clean windows, wash baseboards- She has her own spray bottle and cloth. Even just a little rubbing helps...she's occupied and stuff is getting clean!
19. Pick up- We do a hunt for toys that are misplaced. We make it a game and try to clean it up as fast as possible and take it to the correct room.
I was desperate for a #20 to make it even, but this will do. :) Remember to let them get involved in what you are doing. I even give her light grocery bags to help carry in the house.
A few things to remember-
1. Keep it fun, if possible. I usually have 1 thing she does a day that she doesn't particularly enjoy, but that she helps with. The rest I try to make fun. She'd be horrified if I made a batch of muffins without her. :)
2. Don't do everything in one day. If they want to spend the day by your side cleaning, go for it!! But don't feel frustrated when your 2 year old doesn't jump for joy over washing baseboards. I try to follow the JustMommies Cleaning Calendar, which ends up breaking things down nicely for us.
3. They aren't going to master egg peeling (and other things like this) in a day. Or a week. But it's great to see them try.
4. As you go through your day, try to think of how they can be involved with you.
How about you? Any ideas you want to share?
Thursday, January 14, 2010
Learning While Traveling-Best Toys
I've been extremely busy lately because we've been traveling A LOT! We drove from Minnesota to Georgia, then back, then flew to West Virginia and back. All of this with our 18 month old Tobias! Now my husband got the job he interviewed for in West Virginia so we're moving there in 3 weeks. Add another 15 hour drive onto our schedule, no big deal, right? :)
Along this theme I decided to do a 4-5 part series on learning while traveling. Just like you want to do more than just make it through the day at home, you want to do more than just make it through the trip with your young kids.
The first thing you need for any good car trip or long flight is toys!
Don't ever say a child is "just" playing. That's like saying a surgeon is "just" operating or a pilot is "just" flying an airplane. Play is the essence of being a child.
Think of what kind of activities lend themselves to time in the car or plane and to a varied experience for your child. These include but are not limited to fine motor skills, stacking, sorting, reading, pretend play, and drawing. Your goal should be to fill your child's time with meaningful and interesting work. Parents are not clowns, our job is not to simply amuse our children with flashing lights and moving images. We are teachers, our job is to demonstrate new skills to our children and give them plenty of space and time to explore and practice independently. Keep this in mind when you choose your toys to bring for travel. A toy meant to amuse will hold a toddler's interest for 5 minutes. A toy meant to be explored, completed, manipulated, will hold their interest far longer, often 15-30 minutes.
Here are some of my favorite toys for each of these types of activities:
Wooden Stringing Sets: This has become hands down Tobias' favorite toy. We keep it strictly for church and traveling so it retains his interest. The long "threading needle" wooden piece helps little hands get the beads on and the beads are colorful and large. I would recommend this for 18 months-3 years old. Older children can handle more difficult lacing bead sets, such as the Melissa and Doug one. Those could be used to practice patterns or counting. For children under 3, the simple act of lacing the beads is plenty of stimulation.
Stack and Roll Cups: I like these when we go to visit family because they stack up tiny to fit in the baggage. They can be stacked while sitting in a rear-facing carseat and turned into balls when you get to Grandma's :)
Board Books: Okay, this should be self-explanatory :) I will make a few unique suggestions you may not have thought of though.
Magnadoodle: Nothing beats a toy that inspires creativity, encourages writing, and is mess free!
Along this theme I decided to do a 4-5 part series on learning while traveling. Just like you want to do more than just make it through the day at home, you want to do more than just make it through the trip with your young kids.
The first thing you need for any good car trip or long flight is toys!
Don't ever say a child is "just" playing. That's like saying a surgeon is "just" operating or a pilot is "just" flying an airplane. Play is the essence of being a child.
Think of what kind of activities lend themselves to time in the car or plane and to a varied experience for your child. These include but are not limited to fine motor skills, stacking, sorting, reading, pretend play, and drawing. Your goal should be to fill your child's time with meaningful and interesting work. Parents are not clowns, our job is not to simply amuse our children with flashing lights and moving images. We are teachers, our job is to demonstrate new skills to our children and give them plenty of space and time to explore and practice independently. Keep this in mind when you choose your toys to bring for travel. A toy meant to amuse will hold a toddler's interest for 5 minutes. A toy meant to be explored, completed, manipulated, will hold their interest far longer, often 15-30 minutes.
Here are some of my favorite toys for each of these types of activities:
Wooden Stringing Sets: This has become hands down Tobias' favorite toy. We keep it strictly for church and traveling so it retains his interest. The long "threading needle" wooden piece helps little hands get the beads on and the beads are colorful and large. I would recommend this for 18 months-3 years old. Older children can handle more difficult lacing bead sets, such as the Melissa and Doug one. Those could be used to practice patterns or counting. For children under 3, the simple act of lacing the beads is plenty of stimulation.
Stack and Roll Cups: I like these when we go to visit family because they stack up tiny to fit in the baggage. They can be stacked while sitting in a rear-facing carseat and turned into balls when you get to Grandma's :)
Board Books: Okay, this should be self-explanatory :) I will make a few unique suggestions you may not have thought of though.
- 10 Button Book by William Accorsi--this book has slots for the buttons to fit into on each page so children can count the buttons on each page. This is a bit difficult for Tobias so I'd recommend it for the 2 and up crowd.
- Quiet Books--these are usually cloth books that have zippers, buttons, and snaps for kids to manipulate and work with as they read through the book. Great for keeping minds and hands busy and preps them for buttoning their own shirts and zipping their own coats.
- Cloth Books--there are tons of these around. Tobias has had 3 of these since infancy and they still hold his interest. We keep them in the car because they are soft and in case of an accident wouldn't hurt if they flew across the car and because they are so versatile. Newborns chew them, grasp them, and look at the pictures. Pre-toddlers start turning pages and feeling the different textures and enjoy listening to the story being read. Toddlers will move velcro pieces around, turn pages, and name the things in the pictures. Have I mentioned these are versatile and that I love them?
Magnadoodle: Nothing beats a toy that inspires creativity, encourages writing, and is mess free!
Wednesday, January 13, 2010
Rhythmic Baby
I really like music, and I love to try to get my children to love music, too :) I think most people like music, so it shouldn't be hard.
With my babies, I have a simple activity I do to help them get used to recognizing beats. I have no idea how effective this is at teaching it, but they enjoy the activity. It is really hard to measure results in a baby. With toddlers and preschoolers, you see them responding quickly to things they learn. With babies, you see the fruit long after you sowed seeds.
AGE RANGE:
Your baby needs to be old enough she can sit unsupported. For most babies, this happens around 6 months.
SUPPLIES:
Start the music playing. Sit baby in your lap, facing you. Move your legs up and down--gently--to the beat of the music. I also like to sing along. My babies look at my face and smile away. Toddlers will enjoy this, also, as well as your preschooler when the mood is right and if you are in the mood for a workout.
This is something you can do almost anywhere, so long as you are willing to sing. You can be the sole source of music for this activity if you want to. I even do this at church as we sing the hymns. When Brayden was a baby, this was the best activity to get him past that fussy hour close to bedtime.
With my babies, I have a simple activity I do to help them get used to recognizing beats. I have no idea how effective this is at teaching it, but they enjoy the activity. It is really hard to measure results in a baby. With toddlers and preschoolers, you see them responding quickly to things they learn. With babies, you see the fruit long after you sowed seeds.
AGE RANGE:
Your baby needs to be old enough she can sit unsupported. For most babies, this happens around 6 months.
SUPPLIES:
- Parent
- Baby
- Music
Start the music playing. Sit baby in your lap, facing you. Move your legs up and down--gently--to the beat of the music. I also like to sing along. My babies look at my face and smile away. Toddlers will enjoy this, also, as well as your preschooler when the mood is right and if you are in the mood for a workout.
This is something you can do almost anywhere, so long as you are willing to sing. You can be the sole source of music for this activity if you want to. I even do this at church as we sing the hymns. When Brayden was a baby, this was the best activity to get him past that fussy hour close to bedtime.
Tuesday, January 12, 2010
The Doctor's Office
We are right smack in the middle of winter here in Virginia. We've spent some time at the doctor's office in the past month between the two girls. The doctor's office can be tough. Lots of tempting toys to play with that have previously been played with by sick children that day, probably lots of waiting, and the need for mom to have an uninterrupted chat with the doctors and nurses. So what can you do with your child when you are at the doctor's appointment?
Instead of packing toys that could get lost or are too big to fit in the bag, here's how we keep on learning even when we are out of the house.
I pack a special bag of rarely seen/played with items to help! Here's what is rotated in my tote:
1. A mini doctor's kit- Before the doctor gets in the room (and before the nurse, if we have time) we review what the doctor may do. I go through all the possibilities to hopefully prevent the element of surprise. I may pack a small teddy bear for her to practice. Our doctor is great and examines the teddy bear, too. We listen to the chest, practice taking breaths, look in ears and nose, open the mouth and say "aaaahhh," and even practice what to do in case of a shot. We've been doing this since 18 months old.
2. Mini books- These are for her to look at while the doctor and I talk. We have previously practiced Book Time at home (a time where she reads quietly by herself on the couch) so I just tell her that it's Book Time and we can talk after the doctor is finished. My books are Leveled Readers from my teaching days. I have those set aside for the doctor's office because of their size. Small size means easier to transport.
3. Crayons and Coloring book- Great time to color together. We play "Color Call Out", where we take turns calling out a part of the picture (like Cinderella's slippers) and a color (like green). We rotate calling out the items and the color.
4. Shake and Find jar- I took a few empty disposable water bottles and made them into a fun game for the car or doctor's office. Here's how to make it:
*Wash and dry a plastic bottle, such as a water bottle.
*Add some rice to the bottle, then a small object that you want to hide, another layer of rice and another small object. Continue the layers until you only have 1-2 inches of empty space left at the top of the bottle.
*Use super glue and glue the lid to the bottle. Let it dry.
*Make a list (I have a picture list for my toddler) of items to find. I saved the list to Word so I can print one off when we go off and she can actually mark it off.
*Let them find the objects and check them off as they find them.
5. Play toss the sock- Using one of my books in the bag or a magazine from the room, ball your child's sock up. Let them try to throw it and make it land on the magazine, or even just hit the magazine. (Parenting Magazine August 2008)
6. Pack of sticky notes/stickers- Call out body parts and have them stick the papers or stickers to the correct spot. You can also practice positional words ("Put the sticker on top of ___, under ___," etc).
7. Long piece of yarn and large pasta (with holes)- Have them practice stringing the pasta. They could make a necklace for the nurse, or for themselves. You can bring washable markers to have them decorate the pasta too!
8. Pen-Draw faces on fingers/thumbs and pretend play. "Little Bunny Foo-Foo" and "Where is Thumbkin?" are great choices.
9. Pocket Mirror- Breathe onto a pocket mirror and steam it up. Practice drawing shapes or letters. (Parenting Magazine)
10. Old Magazine and Washable Markers- Let them go through an old magazine and use the corresponding color marker to find things that color in the magazine and check them off. If you don't want to use markers, give them an item to find (pets, drinks, squares) and let them circle/mark them out.
11. Small cookie sheet and dry erase marker-- Draw shapes, letters and have them guess. You can also draw items in the room and see if they can find that item. Another option is to bring a small sandwich bag with magnetic letters which can be used on the cookie sheet.
12. Make ahead bingo- Brainstorm some items they may encounter at the doctor's office and find pictures of those things (I use Google Images). Make a bingo board and see if they can find each of the items. Some choices may be a stethoscope, a nurse, cotton balls, a scale, doctor's chair, or tongue depressor.
13. One thing that is fun and helps teach kids about giving and thinking of others is bringing a special gift to the doctors and nurses. This is helpful if you already know you are going (like well visits) and perhaps especially if you have a child who is a bit nervous about going. It can help ease nerves by giving them something to anticipate...giving a gift that's homemade to the staff! We usually bake brownies or chocolate chip cookies. I also have Charis make a card for the staff.
Hope this helps to make future trips to the doctor a bit more enjoyable for everyone!
Monday, January 11, 2010
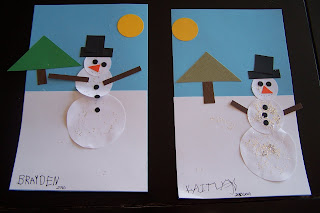
Snowman Shape Pictures
I was thinking about Manda's post on Shape Pictures and realized that I could easily do a snow man shape picture!
AGE RANGE
I would say two and up. Prior to two and your child would need a lot of asssistence, but you can always do it!
SKILLS TAUGHT
- shapes
- art
- fine motor skills
- Pieces of paper cut into shapes. With the older preschooler, you can draw the shapes and let him cut them himself.
- Glue
- Scissors
- Optional: Glitter
- Cut out shapes or draw shapes for your child to cut out. For each picture, I used three white ciricles (three different sizes), one large white square, one black square, one black regtangle, five black small circles (eyes and buttons), one yellow circle, one green triangle, one brown rectangle, two brown rectangles (for arms), one orange triangle, and one blue rectangle.
- Set out supplies
- Introduce the shape pieces to your child. Talk about what shape each piece is.
- Tell your child you are going to use these shapes to create a snowman picture.
- You might need to put the pieces together to show the child how they will all come together.
- If using glitter, apply glitter to snowman pieces or snow piece. I used glitter to be able to see the snow man better since he was white on white.
- While the glitter dries, assemble the other pieces.
- Glue the picture together!
Friday, January 8, 2010
Coloring: A gross motor activity?
At 2.5 my daughter has gone through a love-hate relationship with coloring. One week she loves it, the next barely tolerates it. Don't be discouraged if your child doesn't enjoy coloring yet. Keep on trying!
4. Can't remember who told me about this one, sorry! I haven't tried this one yet, but it looks interesting. Again, tape a large piece of paper on the wall/door. Have your child lay on the floor, toes almost touching the wall. Have them grasp the crayon with their toes and try to draw on the paper. This will take coordination, use of abdominal and leg muscles, and a lot of control. Have them try to draw lines horizontally and vertically. Try drawing a circle. You can even use your hands to slighly guide them and help.
We all know coloring works on fine motor skills. However, there are ways to develop gross motor skills at the same time. Here's a few examples:
1. We have an art desk that has the chair and inclined desk attached. We got it for her when she was 18 months old and she still has to sit/stand on her knees to color. Believe it or not, this is a gross-motor activity. Find a place your child can reach by sitting on their knees (or standing on their knees) and have a spot to color. That may be knees on the floor and coloring on the seat of a chair, or taping a piece of paper a little higher than normal on a wall or door. This way they have to use their legs, hips, and stabilizing muscles to color.
2. Taping paper on the floor and letting them color. I tape butcher paper (huge sheets of it) to the kitchen floor when I cook sometimes and let her color. They have to get on their hands and knees and color. When they do this, they use arm and leg muscles as well making their hip and shoulders stronger. Keep and eye on them, as my daughter tires out this way and ends up laying belly down and coloring with her eyes about a millimeter away from the paper.
3. Thanks to our school OTs that recommended this! Tape a piece of paper on the wall or door or put a piece of paper on an art easel for them to color on. (You can also do this with a chalkboard.) Place pillows or cushions on the floor where they'll have to stand on them in order to color/draw/paint. The soft floor provides a slightly unstable surface to stand on and allows them to work muscles while trying to stabilize themselves by shifting their hips and weight. Kind of like the idea of walking on pavement vs. walking in the sand.
Have fun!!
Thursday, January 7, 2010
Magnadoodle
Age Range: 1 and up
As a lover of all things neat and clean, I love the magnadoodle. It's a simple toy with lots of potential uses.
Activity:
Extensions: sit on the magnadoodle.... what, that's not how they're supposed to be used? ;)
As a lover of all things neat and clean, I love the magnadoodle. It's a simple toy with lots of potential uses.
Activity:
- hold your child's hand around the magnetic pen and help him/her draw a counterclockwise circle. Practice this a few times, then see if they can do it themselves.
- Identify the shape as a circle, or the letter Oo, depending on your focus. Tobias' grandpa showed him this as an O so that's what Tobias calls it. In fact, he finds O's everywhere now, including shouting out O! because there was an O in the sign in the otherwise silent library. Libraries are too quiet anyway, right? :)
- Let your child have fun scribbling, even if their "O" looks nothing like the real thing that's okay.
- Continually reinforce the counterclockwise circle, it will make handwriting easier later on because letters with circles are drawn counterclockwise.
Extensions: sit on the magnadoodle.... what, that's not how they're supposed to be used? ;)
Wednesday, January 6, 2010
Counting With Baby
When it comes to "teaching" your baby things like numbers and letters, there are several, simple things you can do. Here are some of my favorites.
AGE RANGE
You can start these at birth, but please don't expect to see any results for a very long time. One day, you will be reading with your 12 month old and she will tell you the letters in her alphabet book (this happened with us with Kaitlyn). It will just pop out one day and you will see your simple activities have paid off! You can continue doing these things throughout your child's life, making it harder as they get older.
SUPPLIES
Vary based on activity, but in most cases you just need you, your child, and your mouth.
BOOKS
I am always talking about how much I love books. I majored in English, so it is no surprise. When Brayden was a baby, we didn't have much money and thus didn't own a lot of books for babies, but we did have some numbers books by Baby Einstein that we enjoyed. We had the See And Spy Counting Board Book. There are lots of books out there.
On my Babywise blog, I recently asked for people to share their favorite books with me. One that was mentioned several times was Counting Kisses by Karen Kratz. That is one of the books we got for McKenna for Christmas, and we love it! She loves it and I love it. It goes from 10 to 1, with each page having kisses on a different body part (belly button, nose, eyes, hands, toes, etc.). I read it to her and kiss her cheek the number of times for each page. I say each number out loud, so I say, "one" then kiss "two" then kiss, etc.
As your baby turns into a toddler who can count, you can have her count the items on the page or each kiss instead of you.
CLIPPING FINGERNAILS
I had forgotten about this trick, but one day I decided to Google my name and found an article in Parent's magazine with this tip from me. When Brayden was a baby, he hated to hold still. In order to keep him still while clipping his fingernails, I would count each clip. For whatever reason, it worked. I do it with McKenna, and it works.
As Brayden moved into toddler years, I would have him guess how many clips a finger would take or we would challenge ourselves to clip in fewer clips per hand than last time. As he could do simple counting, I had him count each finger. As he got better, I had him count how many clips per hand.
GETTING DRESSED
Carrying the principle over, I often count as I dress and lotion baby. I will say, "put a sock on one foot, two feet." This is a double bonus because you are also naming body parts.
FEEDING
You can count bites over and over up to whatever number you think is good for your child (for babies, I wouldn't go over ten).
EVERY DAY LIFE
I think you can see the picture here and incorporate this into your every day life. My favorite way of counting with my children is to just incorporate it into every day life. Count how many stairs you go up. Count how many toys they are playing with. Count the pieces of laundry you are folding. Take the idea from Kratz and count kisses as you dress baby. Exposure teaches them day by day, little by little.
Tuesday, January 5, 2010
Shopping
Now that I have 2 kids, one of the tougher jobs on my list is grocery shopping. Well, shopping in general. I have not yet mastered the art of managing two children, one grocery cart, a crowded grocery store, checking off a list, reading labels, and keeping on budget while teetering oh-too-close to either a nap time or meal time. Don't get me wrong--my girls are remarkably well behaved in the store, even with a mom on the brink of a meltdown. You may have seen me out and about...you know, the one answering the thousandth "What's that?" question from a toddler while trying to see which items are on sale and removing the cart strap from the baby's mouth for the umpteenth time. I may or may not be crying. *wink* On a good day you'll see me humming to myself, trying to enter in to my quiet place where I can actually remember what's on my list. Or where I put my list. Anyways...
So is it possible to learn AND shop at the same time? Sure! Here's a few things you can do while you are out shopping to help your toddler or pre-toddler learn, have fun, and possibly allow you to get some shopping done without having to resort to "The Quiet Game." :)
For most of these, it helps to have a Shopping Notebook set aside that you use especially for the store.
1. Stickers-- Peeling stickers is a great fine motor activity. Chances are your child will/does love stickers. They don't have to be expensive, either. Local dollar stores have a pretty good selection generally. If you come prepared, draw lines or shapes in a notebook and have them put the stickers on the lines/shapes you've drawn. (A little hand-eye coordination work).
Another sticker option is to call out body parts and let them stick them on. "Put a sticker on your knee. Put a sticker on your elbow."
2. Pre-printed lists- This takes a little pre-planning, but is totally worth it at our house! Here are 2 options:
*Print off pictures of items needed. I use Google Images, cut and paste. I also put them in order of the aisles at Wal-Mart. For example, I know I start in the back of the store with dairy. So all my dairy items are at the top. You can then ask them "What's next?" "What's first?" "What's last?"
*As you shop, call out items on the list and have your child check them off, or mark through them. It will take them a little while to find them and then mark through them.
For older kids, you won't need to call out anything. Just let them observe and check it off!
3. Coupon sorter: Get your coupons ready and as you get your item, let them look through a stack and see if there is a coupon for that item.
4. I spy: This is a personal game, not one they play with you. Draw or print off a picture of an item and glue it on the top of one page (example: a shirt). Then make a column of colors, like a red shirt, blue shirt, green, etc. As they go through the store they have to see if they can find these things, and then check them off. As you wait in line, help them finish off the list and see how many they've gotten.This is a good chance to work on colors, observation, and tallying.
*For older kids, see if they can find more challenging things, like something sweet, grumpy people, happy people, a kid with a toy, a baby with a bottle, etc.
5. I got this idea from Parenting Magazine--
"Honk if you love..." (or quack, whatever) Choose a funny sound and an object. Whenever you see the object (a teddy bear, a circle, a baby) you both have to make the sound. They'll be very focused on looking around and making the funny sounds. It makes shopping fun for us. :)
6. Again, from Parenting---
"Posers in Waiting"--Both of you strike a pose and hold it until the line moves, like making a face, stand on one foot. The person that stays still the longest gets to choose the next pose.
7. Can you find..
*Someone that has the same color shirt on as you?
*Someone with mommy's hair color?
*Someone with something in their cart the same as ours?
*A mommy shopping with 2 kids, like us?
8. Texture talk- As you bag up your produce, ask them questions. "Do you see a food that looks bumpy? How does this feel? Is this soft or hard?" You can even involve them in the process of choosing your food. "I'm looking for bananas that have NO brown on them. Can you find some bananas that don't have any brown?" or "See how this apple has a little spot on it that feels soft. We don't want that one. Check this apple and see if it looks good." "When we pick out a cantaloupe, you can smell this part. If we can smell cantaloupe, it might be a good one. Do you smell anything?"
9. And finally...the Quiet Game. Or the Still Game. Personal favorites of mine when you just need a moment. Pretty simple--see how they can sit perfectly still or perfectly quiet. *Aaaahhh...*
How about for the babies? Talk, talk, talk. Tell them what you are doing, what's on your list, what you see.
Happy Shopping!
Any tricks in your bag? Share!!
Monday, January 4, 2010
Play Foam
Brayden came home from my parent's house one day with a present. It was PlayFoam. After reading the box and learning that it was supposedly no mess, I decided that surely the present was for me! We played with it, and it really is quite clean! It isn't 100% mess free, but it is a lot cleaner than play doh. I really, really like it.
You can use this play foam to make and learn all sorts of things. You can make shapes, learn about colors, and make letters to name a few. For the young artist (or old), you can sculpt animals and other creations.
I will be turing to this more often for practicing making letters than play doh. It is much less of a hassel overall. Not to say don't find value in play doh, I do. But this is cleaner and simpler for something like making letters.
I wanted to share this find with you all! The packaging says it is for ages 3 and up, but I did let Kaitlyn play with it. She is 2.5. Happy sculpting!