Welcome!

This blog is here for you to find fun learning activities to do with your children. We share great ideas we find and love on the Internet, as well as ideas we come up with on our own! We also like to share resources we find helpful.

To find ideas for your child, click on the age range blog label or on the theme/topic you are looking for (on the left side of the page). In each post, we try to list optimal age ranges for the activity, but you must judge for yourself if it is appropriate for your child. When you try an activity out, please comment and let us (and everyone else) know how your child liked it!

Friday, July 29, 2011

Under the Sea snack


Another Ocean idea! A cute snack that's fun to make, and even more fun to eat!

Jello Aquarium:

*You'll need blue jello and gummy fish candy.

*Make jello according to package. After 1-2 hours, as jello is just starting to solidify, add gummy fish/worms.

*Allow to finish hardening in refrigerator.


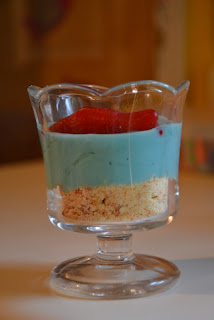
Yogurt Ocean:

*Nilla wafers (or any sandy colored cookie), white yogurt (vanilla, plain, etc) or blue yogurt, blue food coloring, gummy fish.

*Crush cookies (I used a rolling pin and a sandwich bag)

*Dump/spoon on bottom.

*Color yogurt blue if necessary.

*Spoon yogurt in cup.

*Add gummy fish.


Enjoy!


Thursday, July 28, 2011

Color Mixing with Ice

This is a great outdoor activity but a few simple adaptations can easily bring this activity inside during the winter months and actually works well with a winter theme.

Ice is a great medium to practice color mixing.  J and I made yellow and blue ice cubes together. This is an activity all in itself, so be sure to include your little one in this step.  It's a great way to teach the process of freezing. Let them add the coloring and fill the tray using a scooper or a medicine dropper to include some fine motor skill practice!  Then they get to practice patience while waiting to play with their color cubes.

Fast forward to the activity, J first separated the ice cubes into bowls by color and chose to make blue water first.  I filled the tray with a small amount of water.  Make sure the tray is white/clear so you can easily see the water change colors as the ice melts. J really enjoys scooping and stirring the ice cubes, letting them melt in his hands, etc.  He basically plays while watching the ice melt.  This is a great time to let them utilize their motor skill practice with tongs or different size (and length) scoopers or spoons.  I’m surprised at how long a little ice can entertain! 

When he moved onto the yellow ice cubes I asked him which color the water (currently blue) would become and he of course guessed yellow.  I told him it was going to be a surprise that he’d have to wait and see.  He wasn’t convinced the water was actually green until the very end when there was no denying it.  He was sure it should be either blue or yellow!

We then filled the ice cube trays with green water to play with in the future.  This activity is free, entertains and recycles itself too!


Wednesday, July 27, 2011

Paper Bag Puppets


A great way to enhance learning is to make a puppet to go along with what you are talking about. Children love crafts and they love puppets. Are you talking about the letter F? Why not make a Fox? Maybe you are learning about bears this week and want to make a bear puppet. And the great news for you is that the internet is full of instructions on how to make these.

Enchanted Learning has some great instructions for some paper bag puppets: http://www.enchantedlearning.com/crafts/puppets/paperbag/

DLTK is another classic resource with some great puppets: http://www.dltk-kids.com/type/paper_bag.htm


If you don't find what you are looking for on these pages, go to Google and search "paper bag puppet ____ "(insert key word here, like Dog). You will get tons of ideas. 

Tuesday, July 26, 2011

Sensory Ocean/Beach pictures


This activity works for babies (touch and feel), all the way to elementary aged kids! You have lots of options...

*Paint the ocean

*Paper towel paint

*color the ocean w/ markers

*Use the side of a peeled crayon and make the water


Once the water has been drawn/painted, start adding details...

*We added shells collected from a previous vacation

*spread glue on the bottom (we used fingers) and sprinkle w/ sand

*Add glitter to wet paint/glue for a sparkly effect

*Use pom-poms for anemone, collected sticks for seaweed (or ribbon, pipe cleaners, etc)

*Make fish out of construction paper to glue down, or use fish stickers

*Finally, stretch out some cotton balls for clouds.


The idea is to use as many sensory (Touch and feel) items as possible. Dig around drawers, craft boxes and see what could substitute for items under the sea. If I'd had green streamers, I would have added those for sea weed.


For young children, make a small version yourself and let your child touch it, and talk about how it feels (scratchy, rough, smooth, cool, soft, etc).

Monday, July 25, 2011

Freezer Jam


I was talking with Raegan the other day about Brayden and I making freezer jam and how much value there is for children in making it. She was interested in the recipe, so I thought I should share it with all of you.

If you have tons of fruit you don't know what to do with, freezer jam is a great way to go. It is so delicious! If you have never had it, you must try it. This is the best jam ever. You can make several kinds. My favorites are peach, strawberry, blackberry, and best of all raspberry. You can also combine those for new flavors.

It is easy enough to make with a toddler. One thing, though, is that it does take about an hour to make total, which I think is too long to hold a child's interest. The reason is for 30 minutes you just stir it every five minutes. So you might want to have your child help up to the stirring and then have him do something different or off to nap time or something. 

Here are the supplies you need:
  • Pectin. This is the most important ingredient for you. I find it in my grocery store by the canning supplies, but I don't know if stores outside of Utah will really have this and if so, where in the store. So I found the kind I get on Amazon for you: MCP Premium Fruit PectinIt has the instructions in it, so buy the box and then you have the instructions. But I will tell you what else you need.
  • Sugar--lots of sugar. I think it is about 4-5 cups for each recipe.
  • Corn Syrup
  • Lemon juice (bottled is fine)
  • Fruit. Usually about 3-5 smashed cups. 
  • Potato smasher
  • Spoon
  • Bowel
  • Measuring cups
  • Containers for jam. You can use something as simple as the disposable tupperware made by Ziploc, Rubbermaid, etc. You can also use glass jars that can be frozen. I use jars from Kerr that look like the one below. Make sure if you buy glass, it says freezer safe. Ball is also a good brand for jars.

Let your child help as much as you think is appropriate. They can wash berries and smash the fruit with the potato smasher. I let Brayden use a plastic knife to cut the greens off of the strawberries.

A note, make sure you don't smash the fruit too much. You want your jam to be chunky, and while you are stirring the jam over and over, the fruit chunks will break down even more.

You can store your jam for at least a year. The instructions say one year, but most of us who do it will keep it longer than that.


Thursday, July 21, 2011

Ice Melting Bags


This was one of our science activities when J was almost 2 years old. I made several different colored ice cubes using food coloring.  I had J separate the different colors into sandwich bags and we taped them to the dishwasher so they would be at his eye level.  We described the ice together (cold, hard, slippery, heart-shaped in our case).  I opened the freezer door and had him feel inside.  He noticed that it was cold in the freezer.  I told him that ice needed to be kept cold or it would melt. Since we had already worked with ice a little, I asked him if he remembered what happens when it gets warm and he did!!  He replied “water!”  By this point our ice bags had already begun to melt, so I had him look for water in the bags.   He was excited to find some in a couple of the bags!  Throughout the afternoon, we kept an eye on our ice bags.  I pointed out that the ice was getting smaller and the water in the bag was increasing.  We talked about the different properties of ice and water.  By dinnertime, he was excited to show daddy his bags (of now colored water) and to tell him that the ice had become water because they got warm. 

I got the general idea for this activity from  http://www.preschoolrainbow.org/toddler-theme.htm.

You could easily turn this into a color mixing activity or get more specific by placing more ice in one bag and noticing how it melts slower this way, discuss why,…


Wednesday, July 20, 2011

Foam Fish


This is another cute craft Kaitlyn did at playgroup this past year. It is a foam fish. 

Age Range
I think you can make this work anywhere from 1 on up.

Materials
  • Piece of foam
  • Scissors
  • Marker/pen/pencil
  • Stickers, jewels, etc. to decorate fish with 
  • Glue
Activity
  1. You first need a foam fish. Depending on the age and ability of the child, either you draw or have the child draw a fish on the foam.
  2. Also depending on the ability of the child, either you cut out or have the child cut out along the lines.
  3. Now is when any aged child can participate. Time to decorate the fish! For babies, you can pull the stickers off and give them to her to put on the fish. Toddlers can apply glue and put the decorations on the fish. 
Companion Book
This activity would be fun in conjunction with the Rainbow Fish. 

Monday, July 18, 2011

Simple Summer Fun: Squirt Bottles


The item that has occupied my children the most this summer cost me a total of $3.18. It is the squirt bottle. I bought three at the dollar store, and oh how much I have loved them.

All three of my children (6, 4, 2) are enthralled by the squirt bottle. They love to squirt plants, cement, flowers, trees, rocks...they love to see what happens when they squirt and see the designs they can make. They can also squirt themselves and each other when they are feeling too hot. 

Such a simple thing, but it teaches some science and works those fine motor muscles in the hands. 

Sunday, July 17, 2011

New Blog Look!


Many thanks to Tracy who has given our blog a whole new face lift! So much fun! We also now have a Facebook page and a Twitter page...we don't have anything going on yet, but like us and follow our tweets to know when we do :). You can find those links on the right.  Thanks Tracy!

Design by Tracy
WEB - http://designbytracy.com
FACEBOOK - http://www.facebook.com/pages/Design-by-Tracy/228680877142356
TWITTER - http://twitter.com/designbytracy
EMAIL - info@designbytracy.com

Thursday, July 14, 2011

Homemade Audio Books

When I was little my grandmother recorded stories on tape for us all the time.  We still have some of them!  She also sent some to my cousins who were overseas at the time.  I think this is an awesome gift for little ones that live far away.  They get to hear your voice on a consistent basis, acting out your love from thousands of miles away by reading stories to them!

 
A few years ago I took the same concept and made a set of books on CD for my nephews (age 2 and 3 at the time).  I chose some favorite books from childhood and recorded myself and my husband reading them using my computer. 

I used a free recording software called Audacity.  It worked well.  Their software was easy to use and easy to edit.  I later went in and added a little chime sound for when the page should be turned.  The software made it easy to dub the chime to my saved recording.  Just Google “free sound effects” to find a wide array of choices.  Finally I burned all the stories onto a cd, made a cute little cover for it and packaged cd and books together for my nephews. 

We also recorded some fun family stories and songs and I added a few stories from my grandma and grandpa using the tapes they gave us as kids.

I should add that I am not a technological expert by any means.  I have trouble with Facebook! :)   I guarantee that if I could do this, anyone could.

It really wasn’t a difficult project to complete and I think it’s a great gift.  I recently burned all those same stories onto a cd for J so it’s become a gift that keeps on giving!  It’s been great to use on road trips and plane trips.  It also works great while cooking dinner or entertaining toddler while busy with the baby.

Since all toddlers and preschoolers tend to love hearing themselves, a great addition to your audio assembly would be having them join you in reading key words, recite a poem or even read a simple book themselves.


Wednesday, July 13, 2011

Face-Out Bookshelves Tutorial


Here is our tutorial on how to do a face-out bookshelf. This is the way my husband designed so you couldn't see a back on the shelves--it looks like they are free-floating. Hopefully I can translate from Engineer-ese to English.

Materials Needed:
  • 3/4"x1.5" pieces of wood cut to the length you want them on the wall. This is the actual size of the wood. They will be called 1"x2" in the store. You will need two pieces of wood for each shelf. Buy as many as you need to fill the space on your wall.
  • 3" Grabber screws
  • Glue if desired (we used wood glue)
  • Paint and paint brush (we use foam brushes for projects like this)
  • Finish nail gun nails
  • Wood putty
Tools Needed: 
  • Drill
  • Router and/or Table Saw
  • Measuring Tape
  • Pencil
  • Finish Nail Gun
Prepping Wood
1.First, buy your wood. If you are confused on what to buy, see the picture below. Click on it to enlarge. The wood shown in this picture would make one shelf. Cut wood to desired length.


2. Next, you need to router and notch one piece of wood for each shelf. 

Use a router or a dado on a table saw to notch one corner (all the way down the long side) as shown. Again, click on the picture to enlarge.


Use a router the opposite corner if desired. You can do it however you like things done. We used a 45 degree chamfer. You could do things more fancy if you like, or you can do nothing at all.

3. Brush all sawdust off and paint. Allow paint to fully dry. You don't have to paint the 1" (3/4") sides of the un-notched wood. 

Putting Up the Shelves
1. Measure and mark on your wall where you want the shelves. You might want to involve a level.

2. Pre-drill holes in your wall where studs are. It is very important you drill into studs.

3. You can glue one side of the shelf if desired and hold to the wall. We can't remember if we used it at this step or not.

4. Use 3" grabber screws to anchor to the studs. You want the 1" (3/4") side facing out so the long side of the wood is where your book will sit. Countersink screws so that they to just below the surface of the wood. Just make sure you don't go too far and split your wood.


Here are all of our initial pieces on the wall


 5. Uses a finish nail gun to put up the face piece. At this step, we did use glue to secure the two wood pieces together. You want the notched side in and up and the routered side out and down. See the picture below. The notching makes it so the shelf is a bit deeper while providing a lip to keep books on the shelf.

Finishing Touches
1. Use wood putty to fill in holes where finish nail gun put nails in. You want this to just go in the holes and not bump out beyond the hole.
2. Paint over wood putty once it is dry.
3. Put books up!


Tuesday, July 12, 2011

Face-Out Bookshelves--Part Two

So yesterday Valerie posted about her face-out bookshelves, inspired by Jim Trelease's The Read-Aloud Handbook. Having also read Jim Trelease's book after Valerie raved about it for so long, I was enamored of the face-out bookshelves too! After some quick googling for images similar to what was posted yesterday I was practically drooling :)

This obviously called for a trip to Ikea. I found the perfect solution for us since my husband has little time for building shelves and our budget is rather tight. These picture ledges from Ikea are the perfect size for displaying books. We got two long ones and two short ones. Honestly I much prefer the long ones, but the short ones can be useful in a tight space and you can go vertical with them. I also like that they come in black or light wood tone so if white isn't your style you can make them fit into your home's decor.

(this is our playroom, note the shelves above the toy bins)

(I recently changed out some of the lower shelf books)
(this is the other side of the playroom, with 2 small Ikea shelves within reach of our glider rocker)
(see, perfect for cozying up with a book during roomtime)

Jim Trelease claims that books that are more visible will be used more, and I can say that those books on the lower two shelves get read ALL THE TIME now. In fact I confessed to my husband the other day that I am tired of reading aloud to Tobias and wish I hadn't put the shelves up, lol! (I'm only joking, I'm happy he's loving his books).

Now I'm using those lower shelves to display books according to our theme. Right now we have books on Family on the small shelf, come September I'm sure it'll be full of books about pumpkins and trees and fall.

Monday, July 11, 2011

Face Out Book-Shelves


Oh how I love the concept of face-out bookshelves! The idea is simple. Think about a book store. How do they face the books they want to promote and sell? Are they spine in, or cover out? Cover out right? Seeing the cover of a book increases visibility, which increases how often it gets read (or purchased in a book store).

Jim Trelease suggests you find a place to do face out bookshelves in your home for your children in The Read Aloud Handbook. (See his website here for full info and pictures: http://www.trelease-on-reading.com/rah-ch7-pg3.html#raingutters). 

Ever since reading about this brilliant idea over a year ago, I have wanted it in my house. For this past Mother's Day, my wish came true! My husband designed and built these shelves for me. This picture was taken shortly after the completion, so obviously things were not all in place yet...and they are not today, either. 

The very top shelf is for pictures and whatever....I haven't nailed that one down yet.

The empty shelf in the picture is my "picture shelf." This is where I am putting photos of my children reading. I got a picture taken of the three of them reading and had it put on a canvas. The other photos will be printed normally so I can easily and inexpensively change them as I want to.

The uppermost row of books you can see is the shelf for chapter books and books my husband and I are reading. I am always reading several books at a time, and this seriously makes it so much easier for me to keep straight what I am reading and what I should be reading. 

The next shelf down I use as a shelf for books we have checked out from the library that I will be returning on our next visit. This encourages the children to read the book and also warns them if a favorite book is about to return.

The bottom two shelves are for books that fit the theme of the current week for learning activities and the next week of learning activities.


These shelves are so very worth it. I love having them. My children love them. They look at the books all the time. This Wednesday, I will have a full tutorial for you with instructions for how to build these exact shelves.

But this is not the only way to do these shelves. We talked about this in a reading book club I am in and here are ideas found on the web by ladies in that group. You can see there are many amazing ways to do these shelves!

Hanging Book Sleeves--easy to make

Flat Wall Book Holders--great for small spaces. Make yourself.


This is from IKEA. You apparently can't see the entire book, but it is an option for  you.

10 Dollar Ledges--make yourself

Raingutters are a very inexpensive and easy way to go.

Another inexpensive option is the spice racks here!

So there you have some ideas! Manda will share what she has done tomorrow, and I will share our tutorial for the ones we made. The neat thing about ours is that you can't see the hardware--how we hung it. No screws--it looks free floating. I love that. 


Friday, July 8, 2011

Taking Advantage of Vacation

Ever get really attached to a certain routine? I do. Namely the bedtime routine. I caught myself on this past vacation. It started with the sunset. I've seen it a million times...I've watched the sky turn that sherbet orange and fade to cotton candy pink and gradually turn shades of blue until the stars begin to show themselves.


But you know who hasn't? My daughters. They are usually in bed, on their way there, or out of range.


Vacation is wonderful. It's a chance to semi-relax (I say semi because, well, I have children), eat fun foods, sleep in (bwhaa-haa...just kidding) and enjoy company. And for my daughter, to her delight, a chance for me to sneak in after bedtime and get her up to watch a sunset.


Needless to say, she adored it.


I'm a stickler for bedtimes. But sometimes you need to go for it...why not?


So this next vacation (or stay-cation), look around and look through the eyes of your kids for a minute. My every-day-ordinary-sunset was an exciting and wonderfully special event for my daughter.


Take a minute to watch the clouds with them...


To teach them about new things, like binoculars...and how the current ripples and takes on a pinky-gray tint from the sunset's reflection. Don't forget to take time to enjoy the little moments, to belly laugh a few times, and to *gasp* keep the kids up a little past bedtime.


"To bring up a child in the way he should go, travel that way yourself once in a while." ---Josh Billings

Saturday, July 2, 2011

Counting Sheep


A few weeks ago we got the cutest book from the library, The Sheep Fairy. It's a bit silly, perhaps not quality literature, but cute nonetheless :)

After reading it since we were also working on number sense and counting we decided to make some sheep to count.

Materials:
  • cotton balls
  • glue
  • construction paper
  • crayon
Instructions:
  1. Draw small circles on the paper and have your child put a dot of glue in each circle.
  2. Have your child place a cotton ball on each dot of glue.
  3. Draw an oval for a head on one side of each cotton ball and 4 sticks for legs. If your child can scribble feel free to guide him/her in drawing their own sticks for legs on the bottom of the cotton balls.
  4. Have fun counting sheep. Feel free to include as many or as few as you and your child want!


LinkWithin

Related Posts with Thumbnails